How modern accountants automate client onboarding in 2025
Discover our full guide on client onboarding for accountants. Learn how to automate your onboarding process to create a great client experience.


You just signed your latest accounting client. Congrats!
Now, it’s time to get serious and create an unforgettable onboarding experience that will set you apart from other accountants.
However, what many firms get wrong is that they still handle client onboarding for accountants the old-fashioned way. There are endless email chains to collect documents, phone calls, and manual contracts being sent back and forth. And honestly, it doesn't make the best first impression.
But what if you could automate most of your client onboarding process? What if your new clients could upload their documents, sign contracts, and get started — all without you having to do anything until it's time to actually do the accounting work?
That's exactly what we're going to cover in this post. I'll walk you through six simple steps to automate your entire client onboarding process using modern tools and workflows that will save you hours every week and make your firm look incredibly professional.
By the end of this article, you'll have a system that works while you sleep, impresses your clients, and frees up your time to focus on actual accounting.
Alright, let’s get started.
What is onboarding in accounting?
In accounting, client onboarding is a series of steps you go through with every new client that decides to work with you. This typically includes you collecting your clients’ tax returns, business expenses, getting contracts signed, setting expectations, and giving your client access to the systems you’ll use to communicate, share documents, and manage their financial records.
It’s your chance to create an unforgettable first impression and lay the foundation for a long-term relationship. And when done right, your onboarding builds trust, improves your client retention, and shows clients that you run a professional, modern firm.
In the rest of this article, I’ll walk you through how to automate each part of this process, so you can onboard clients faster, stay organized, and spend more time doing actual accounting work.
6 steps to automate your client onboarding as an accountant
Here are six steps to client onboarding for accountants:
- Use a client portal platform
- Set up an automated intake form with triggers
- Kick off communications in your client portal
- Invite your client to their dedicated portal
- Get your contracts e-signed
- Generate automatic invoices with subscriptions
Let’s go over each one.
1. Use a client portal platform
The first step to automating your client onboarding as an accountant is to use a client portal software. This is how you're going to automate not only just your onboarding but many different parts of your entire client experience.
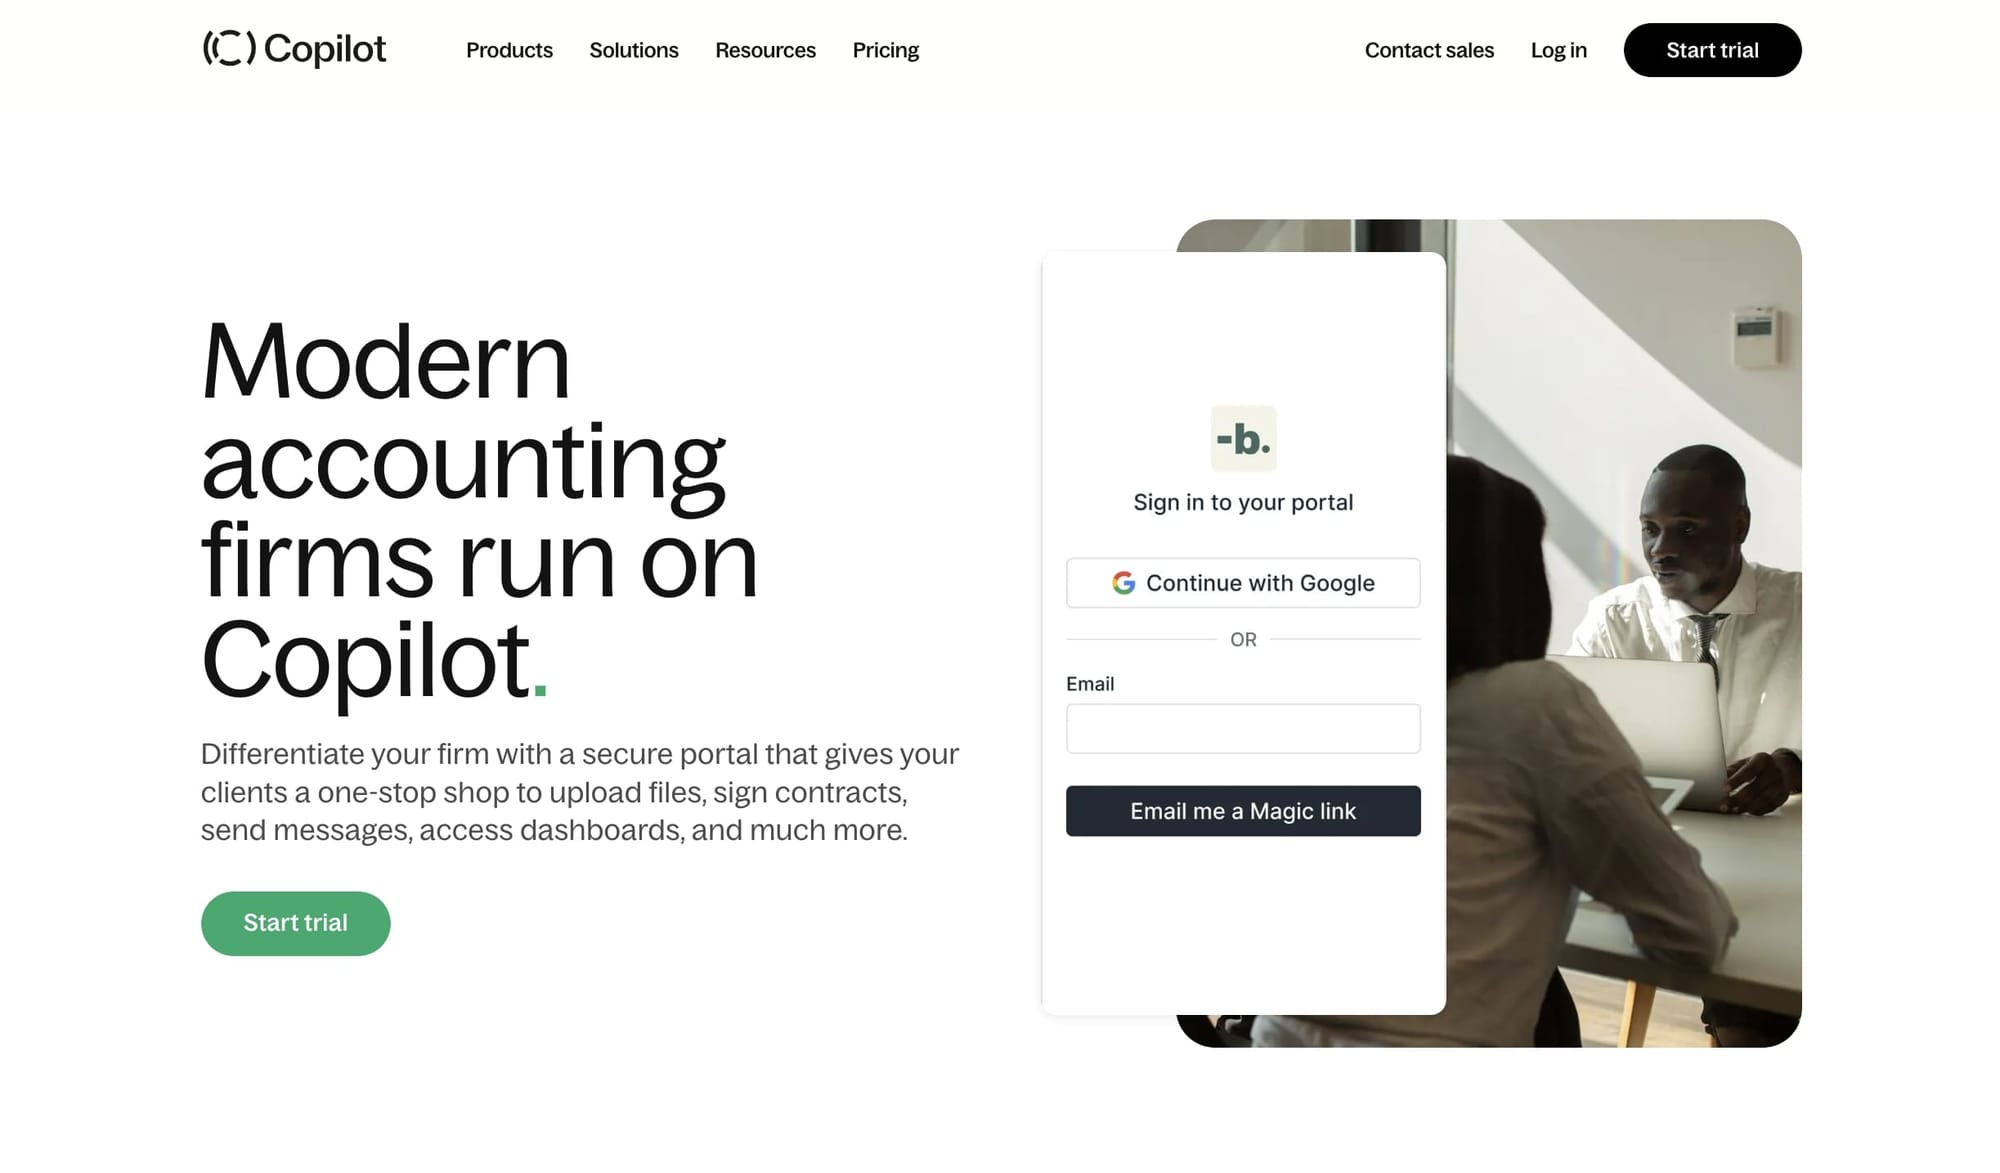
I already wrote a post on some of my favorite client portal tools, but for the sake of this article, we're going to use my favorite one that I've been using for my own agency: Assembly.
Assembly is a widely used platform, especially for accountants and bookkeeping firms, and it's a great way to create a secure portal that gives your clients a one-stop shop to upload files, sign contracts, send messages, pay invoices, and a ton more.
It can integrate with platforms like QuickBooks or Zapier, so you can integrate your existing tech stack into the platform.
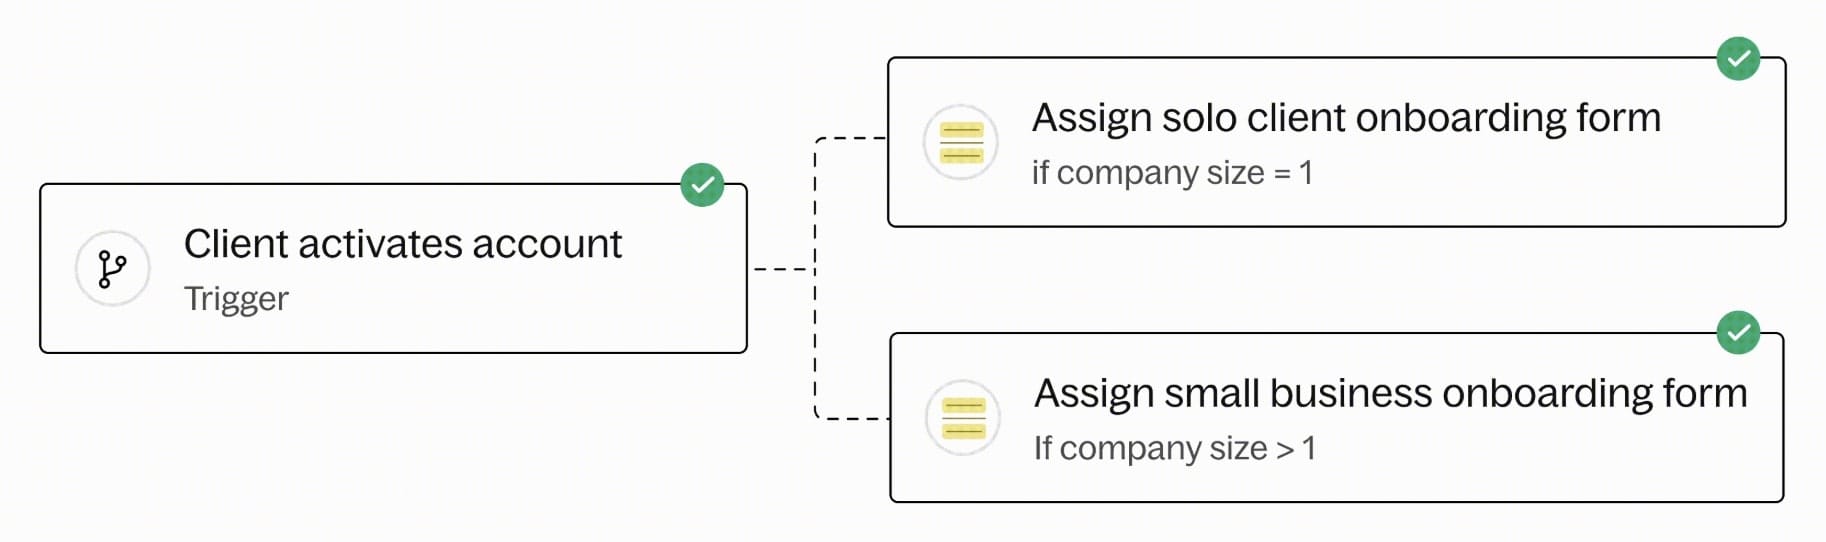
It's great when it comes to client onboarding because of its automation features that allow you to create different triggers when clients are created. For example, when it comes to your client onboarding process, you can create triggers for when somebody creates their own account through their client portal that then automatically sends them a welcome message or an intake form so you can quickly onboard clients without a lot of back and forth.
On the client experience side, your clients using a platform like Assembly is great because it makes your accounting firm look professional. I don't know about you, but I've personally worked with a few different accounting firms for my own agency, and many of them don't use software, and it's quite a headache to constantly go back and forth on the phone or even through email. And even a lot of times, I don't feel safe uploading sensitive documentation through email.
But through Assembly, everything is secure and your clients can easily upload documents, and you can download them and view them (and vice versa).
If you want to learn a little bit more why I love Assembly for accounting client portals, you can check out Jason Staat's video here:
If you’re a fan of Jason’s work, you can also check out his Assembly template, designed specifically for accounting firms.
Assembly is free to start using, so I highly recommend you play around with the accounting demo portal. And once you've signed up, we can go on to step two where we'll begin creating our client onboarding workflow.
2. Set up an automated intake form with triggers
Once you’ve got your client portal set up, the next thing you’ll want to do is build an intake form. This is one of the easiest ways to start automating your onboarding process—and it saves you from sending the same “Hey, can you send me XYZ?” emails over and over again.
Inside Assembly, you can create custom forms that collect all the info you need up front. Things like business details, entity type, service needs, deadlines, and any other important context that helps you hit the ground running.

If you want some inspiration, I actually rounded up a few great intake form examples you can borrow from. And if you’re brand new to intake form automations, we also have a guide on how to set up automated intake forms that walks you through it step-by-step.
Once that form is submitted, you can trigger follow-up actions automatically. For example, you can send a welcome message, notify your team, or even kick off the next step, like sending over a contract for e-signature (which we’ll get into).
You can also create different forms for different services. So if someone’s signing up for bookkeeping vs. tax prep, they’ll only see the questions relevant to them, and get routed into the right onboarding flow.
The goal here is to take your time back from onboarding, while also give your clients a sense of control. No more email chains. No more confusion. Just a clean, streamlined system that works behind the scenes while you go out to find more clients for your firm.
Next, you want to create a welcome message so when the time comes to invite your clients, they automatically see your message and know what steps to take.
3. Kick off communications in your client portal
The next step is to create a welcome message that automatically shows up inside your client’s portal when they log in for the first time.
Inside Assembly, you can do this using the Messages App, which lets you send direct messages to clients and even automate them based on different triggers. For onboarding, I like to create a message that goes out as soon as a client account is created or once the intake form is submitted.
You can also add links directly to the form, contract, or even a Loom video if you want to walk them through what to expect.
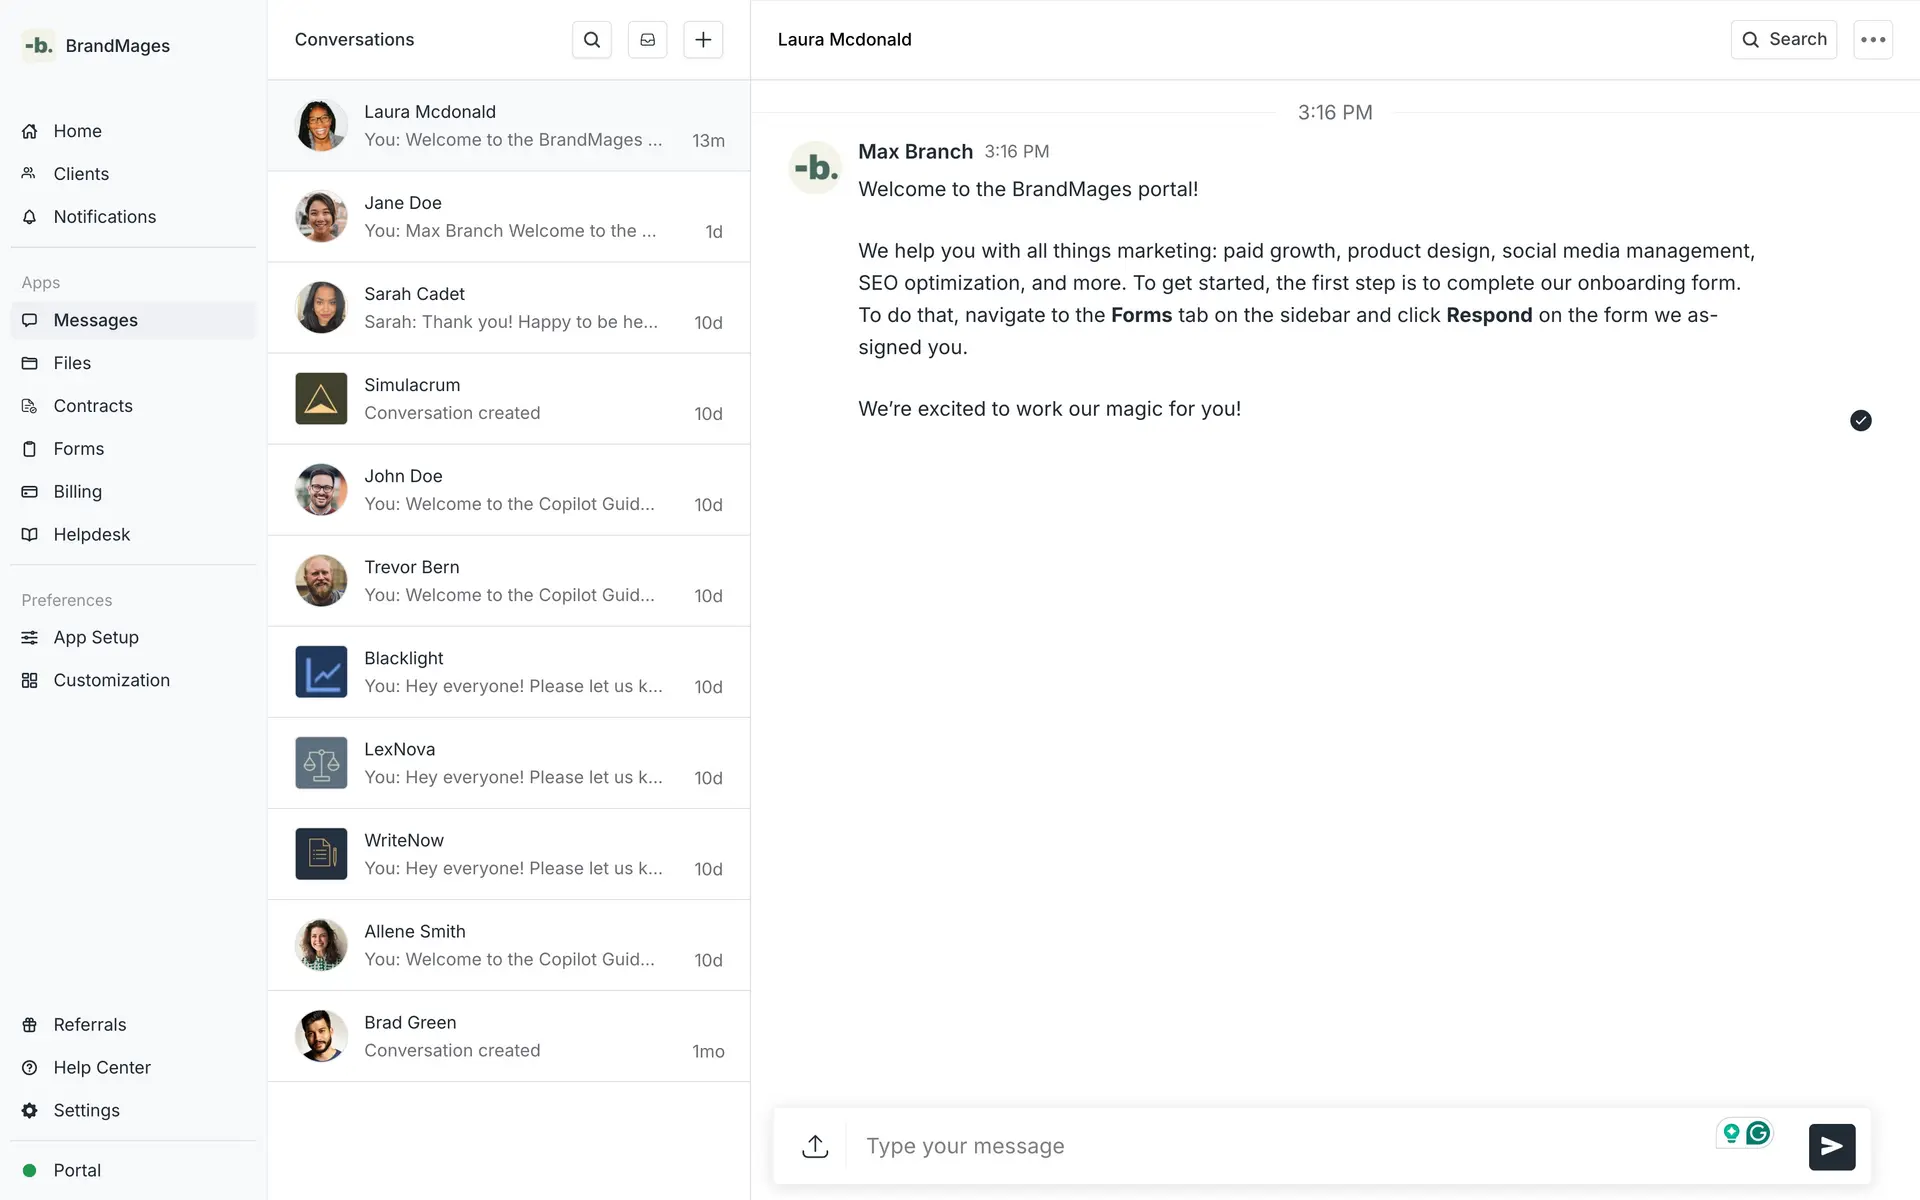
This message is what kicks off the client relationship. It sets expectations, guides your client on next steps, and shows them you’ve got your systems together.
Next, we’ll look at how to invite your client into their portal and complete the full loop.
4. Invite your client to their dedicated portal
Now that you have your intake form and welcome message ready to go, it’s time to actually invite your client into the accounting portal so they can get started.
This is easy to do with Assembly, and there are two routes you can take.
The first one is to manually create a new client profile, and from there, you can trigger everything automatically — send the intake form, show the welcome message, assign them to a segment, whatever you need. If you want a quick walkthrough, here's a step-by-step guide on how to create clients inside Assembly.
Or, if you want to make it even more hands-off, you can send your client a link so they can sign up on their own. This is perfect if you're embedding the portal into your website or just want to simplify the process on your end.
I personally would start with the first one, manually adding clients. Once you do this a few times and everything in your onboarding process is smooth (as in, no complaints or confusion from your clients), then you can start to switch over to the second route.
If you're a visual learner (like me), here’s an interactive walkthrough where you can try out the manual client creation flow yourself:
Once your client is added, whether by you or by signing up themselves, they’ll get an invite to set up their account and log into their new portal. And from there, they’ll see your welcome message and intake form waiting for them.
It’s a super smooth way to make a strong first impression.
5. Get your contracts e-signed
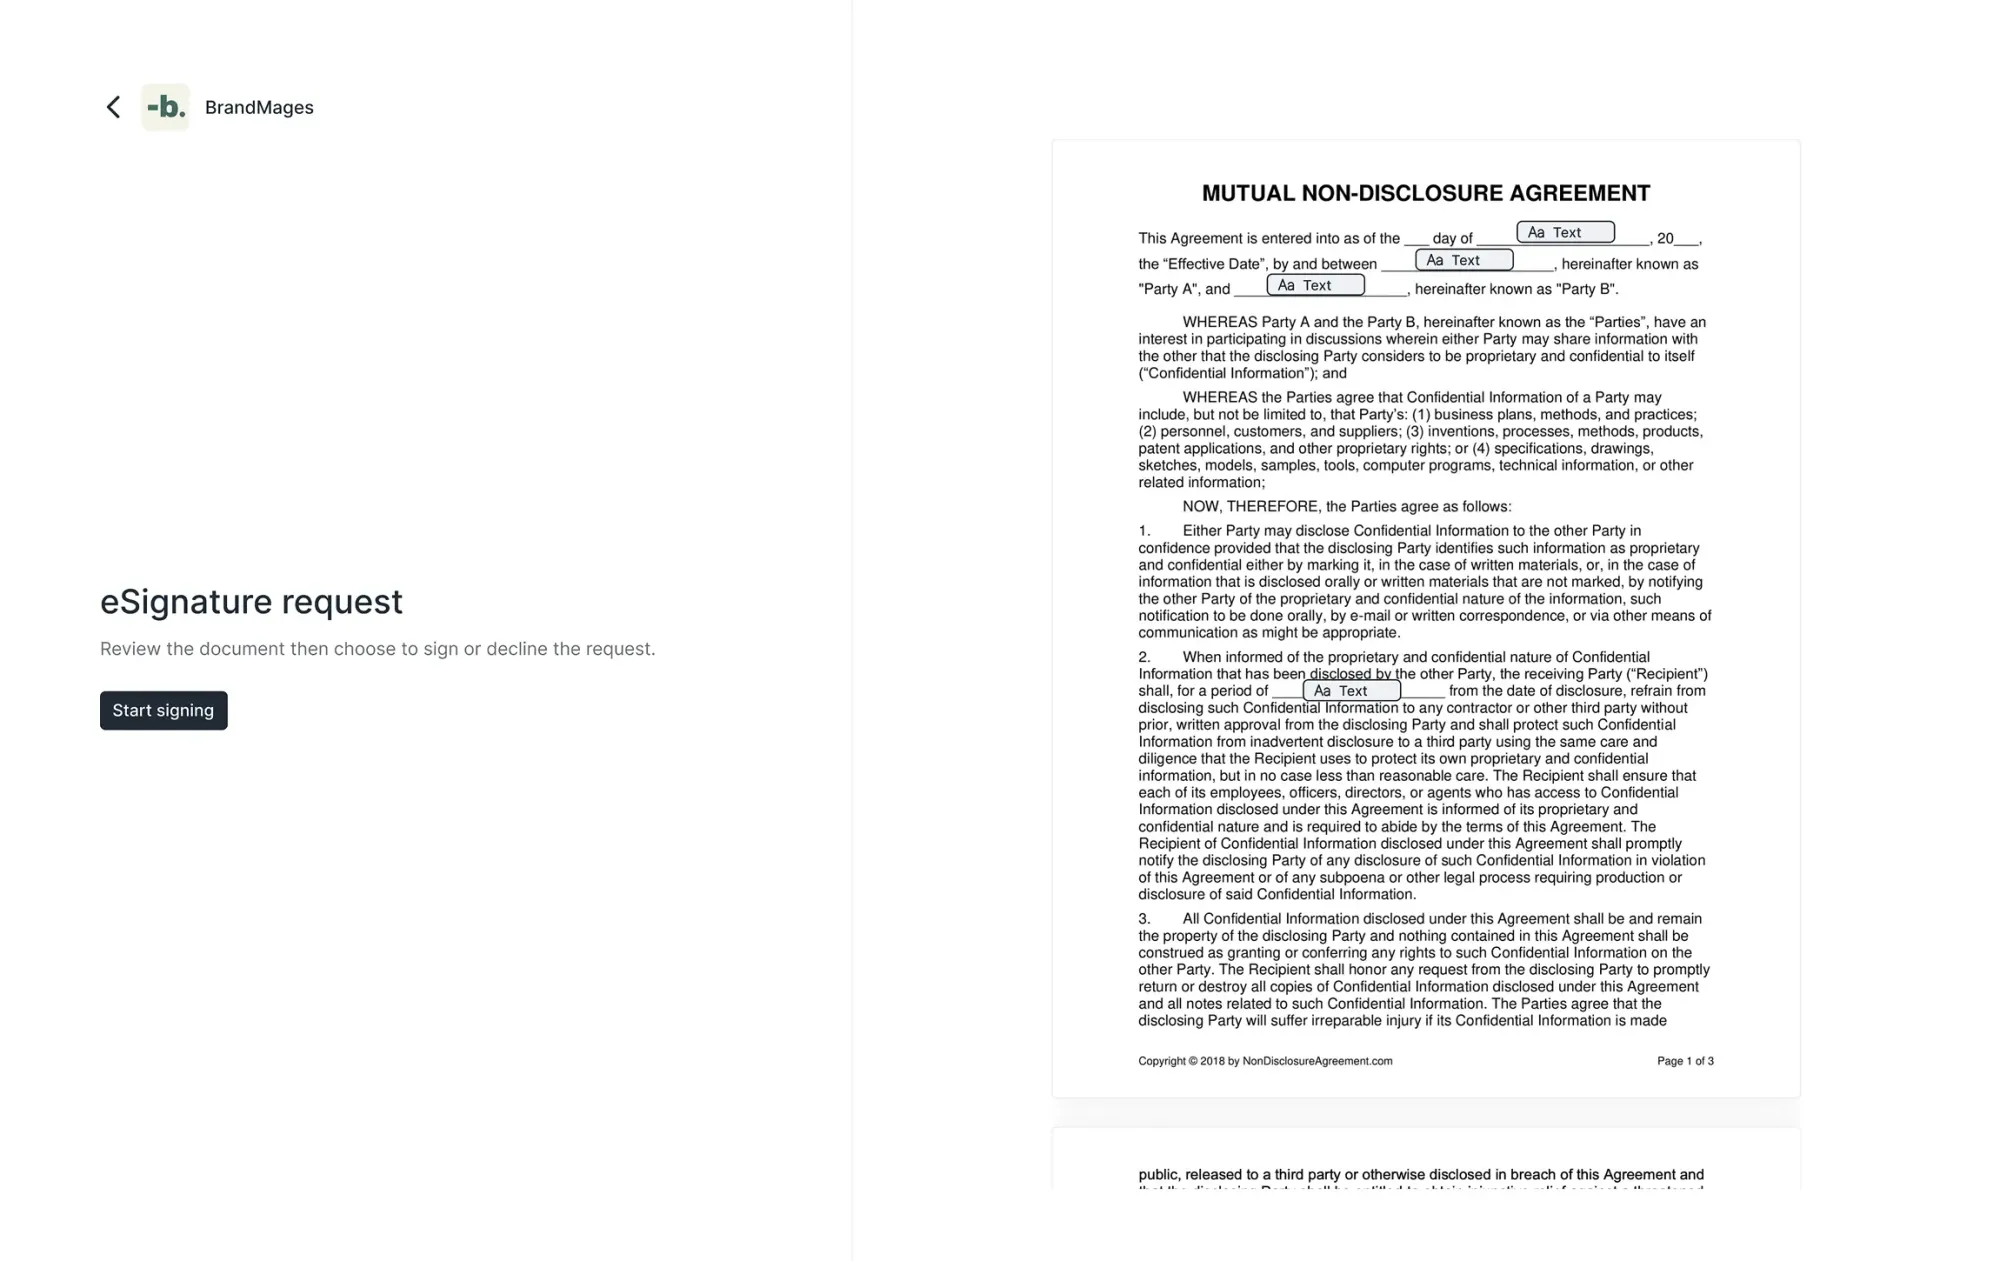
After your client joins the portal and fills out their intake form, the next step is to send them your contract or service agreement. But instead of emailing over a PDF or having to pay for DocuSign, and waiting days for a signature, let’s just automate it.
Assembly has a built-in Contracts App that makes it super easy to send documents for e-signature directly through the client portal. Your client gets notified, they open the document, sign it digitally, and boom, it’s done. No need to integrate with third-party e-signature software.
If you're new to e-signatures or just want to know how it all works behind the scenes, we’ve got a quick guide on what an e-signature is and how it’s legally binding. Spoiler: Yes, it holds up just like a handwritten signature, and honestly, most clients prefer it.
You can learn more about Assembly’s e-signature features here, but the short version is: you can upload a contract template, fill in dynamic fields like client name or company name, and send it out in just a few clicks. You can also trigger contract delivery automatically after an intake form is submitted or after you manually add the client.
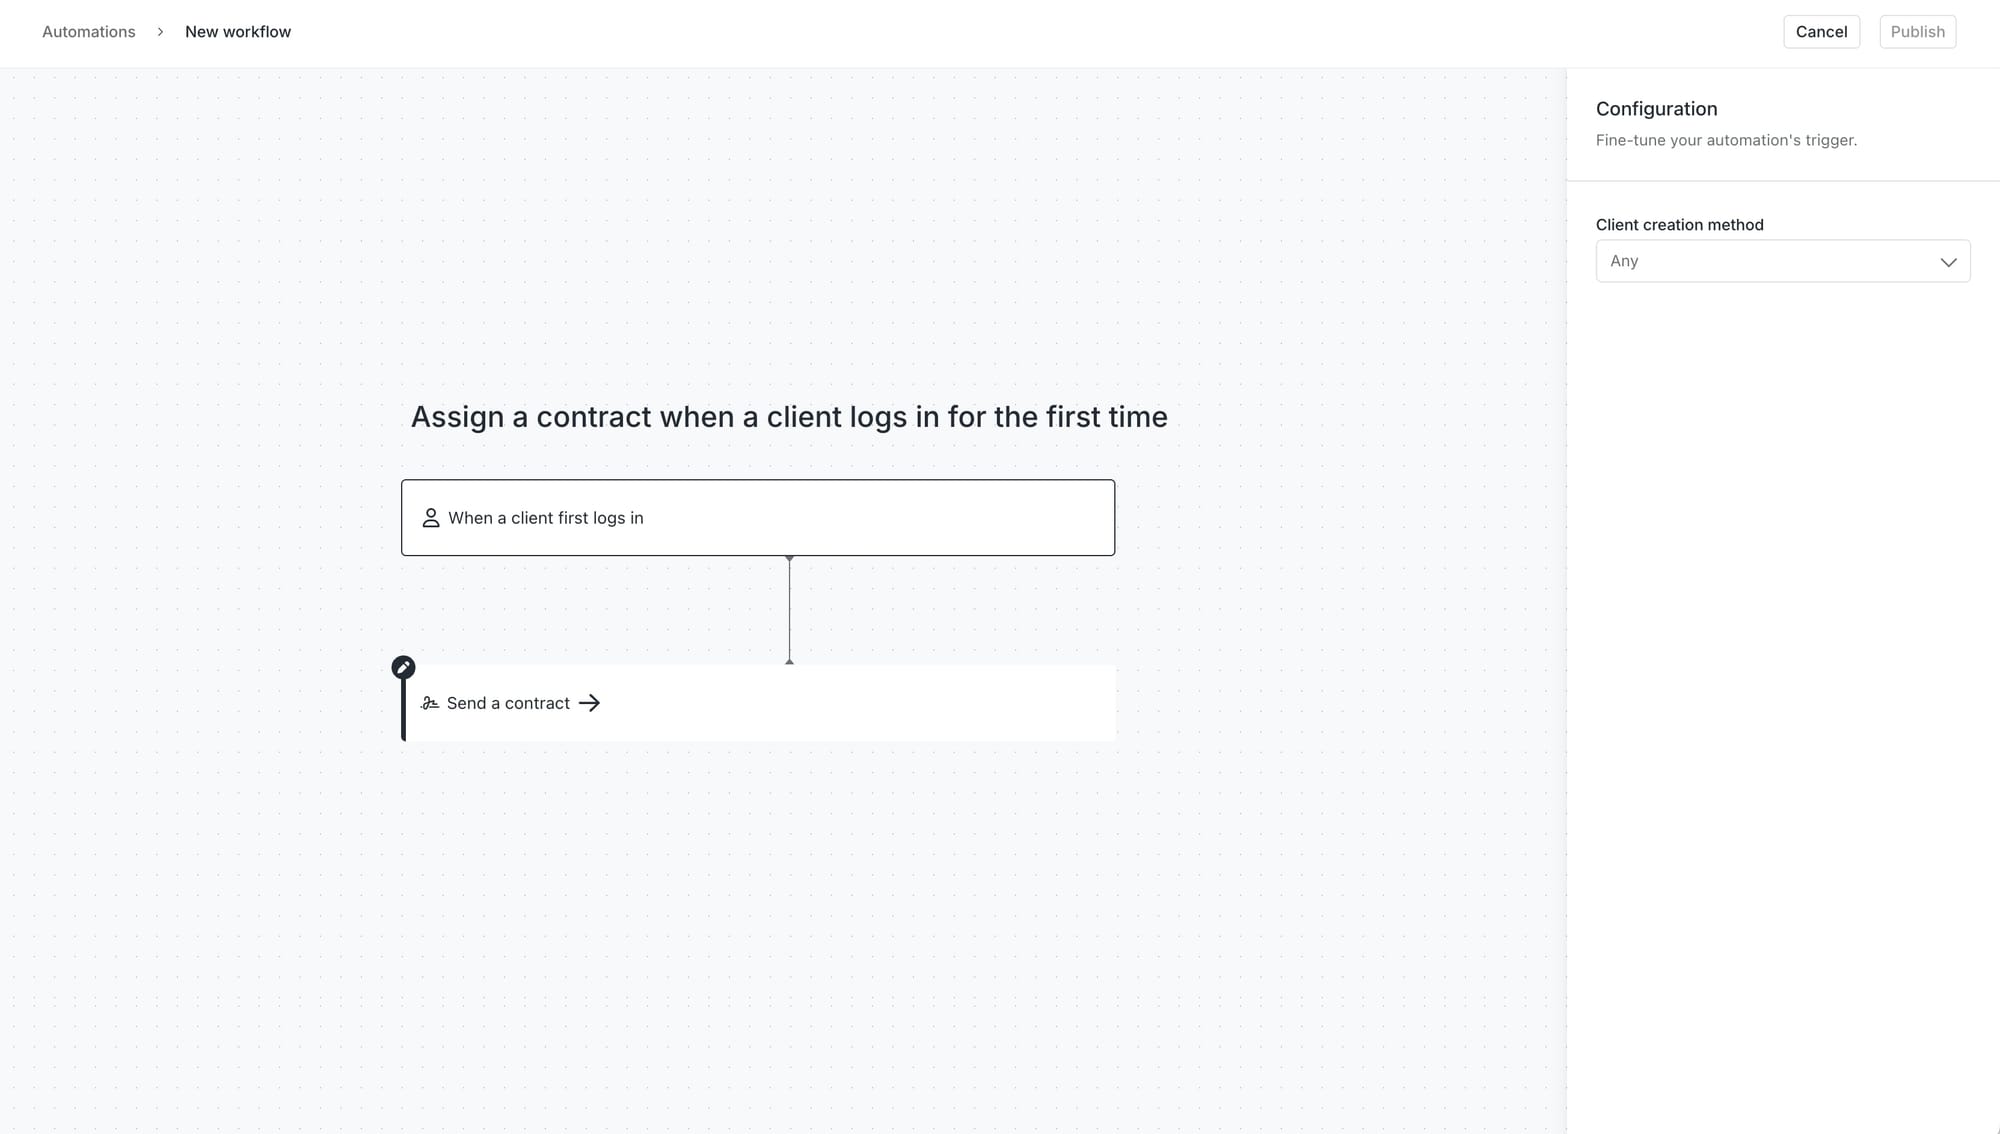
Personally, I like to set this up so that the contract is waiting for them right when they log in for the first time. It’s one of the first things they see in the portal, and it signals, “Hey, we’re getting started.” That way, there’s no delay, no awkward gaps, and you can keep the momentum going while everything’s still fresh.
In the Automations tab in Assembly, there is already a workflow template for this so it’s easy to set up.
Once they’ve signed, you’ll both get a copy, and from there, you can move right into billing, without ever leaving the platform.
6. Generate automatic invoices with subscriptions
Once your contract is signed, it’s time to get paid. And the best way to do that? Set up automated billing so you’re not manually creating invoices every month.
This step is technically outside the onboarding automation flow, but it’s an important one to set up early so you don’t have to chase payments later.
Inside Assembly, you can use the Billing App to create one-time invoices or set up recurring subscriptions that automatically charge your client on a set schedule (monthly, quarterly, or annually). You can also link up your Billing products in Assembly with QuickBooks using Assembly’s QuickBooks integration.
So while you can’t fully automate invoice creation based on a trigger (yet), you can create a subscription that automatically bills your client once they’ve signed and you’ve manually set it up. If your services follow a flat-rate or retainer model, this is the move.
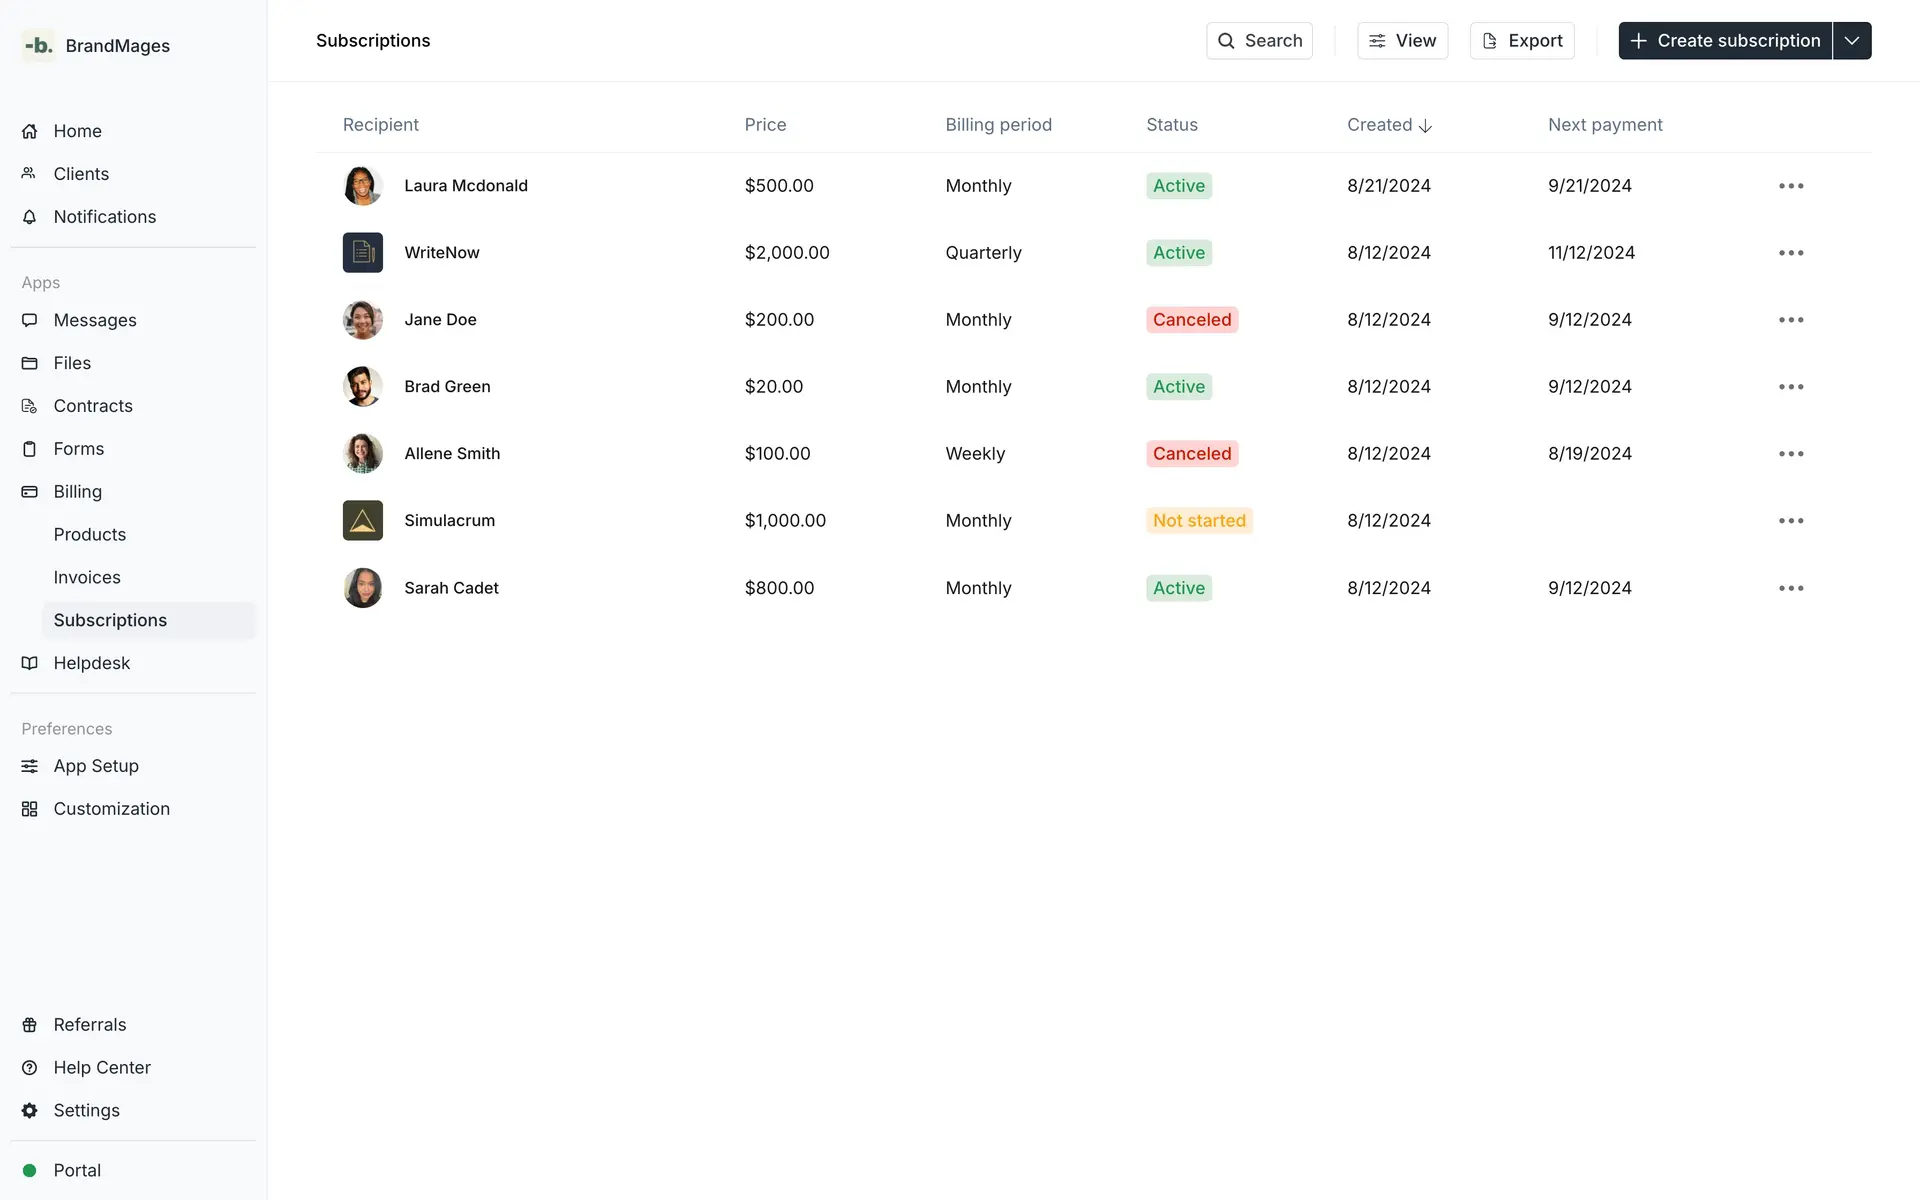
If it’s your first time billing a client through Assembly, here’s a quick guide to walk you through it. Once it’s set up, your clients can pay via credit card or ACH directly through their portal.
So while it’s not part of onboarding automation in the strictest sense, it’s still a key part of your new client experience. And it’s also one less thing to worry about once it’s up and running.
Accounting firms scale on Assembly
At the end of the day, building a systematized client onboarding experience is all about setting the right tone for a long-term client relationship.
Accounting firms who invest in better systems before tax season see the difference: less back-and-forth, smoother client communication, fewer errors when handling financial data, and ultimately, better client retention.
Assembly gives you the tools to make that happen. From the moment a client signs up to the day you’re reviewing their financial records, you can build a process that feels professional, consistent, and easy to manage.
Whether you’re just starting out or already running a firm with dozens of clients, Assembly helps you scale with workflow automation, secure client portals, and tools designed specifically for modern accounting workflows. You can even build out your own accounting client checklist, collect client feedback, and use accounting workflow templates to onboard faster without having to go through the same process over and over.
At the end of the day, your clients just want to feel taken care of. And with Assembly, you’ll give them a clean, secure, and professional experience that does just that.
Happy onboarding!