Client billing: A full guide to getting paid for your work
Nothing beats the feeling of getting your first invoice paid. In this article, I'll walk you through everything you need to know about client billing.


Nothing beats the feeling of getting an invoice paid on time.
But to get to that feeling, there are a series of steps you need to take.
This is the article I wish I had when I started freelancing over 2.5 years ago. In the beginning, I didn’t even know what an invoice was.
But now, I’m able to send invoices super fast, have them get paid on time, and keep my books in order for tax season.
In this article, I’ll show you what you need to think about as it pertains to client billing, the types of ways you can bill clients, and give you a four-step tutorial on how to actually send invoices and get paid on time.
Alright, let’s get started!
What is client billing?
Client billing is the process of invoicing your clients for a specific service you’ve done for them. This typically involves having a pre-determined rate (usually noted in a contract before the work begins), using invoicing software to send your invoices, and setting a clear way for clients to deposit money into your account.
Having a successful client billing approach means that your invoices are clear and sent on time, your clients know exactly when to pay you (and what happens if they don’t), and your incoming cash flow is being tracked for easy tax filings.
Client billing can also look different based on the business model you use. Not all approaches fit all types of clients. In the next section, I’ll go over the different types of ways most service providers approach billing their clients.
Different types of ways to bill clients
There are many different ways you can approach billing your clients. This mainly depends on how you’ve structured your services and what pricing model you and your client agreed upon in your client contract.
Here are some of the most common ways to approach client billing:
- Hourly Billing: Charging clients based on the number of hours worked.
- Fixed-Rate Billing: Charging a set fee for a specific project or service.
- Performance Billing: Clients only pay when you drive them real business results (commission-based).
- Subscription Billing: Charging clients on a recurring basis for ongoing services.
I wrote a full guide on this topic alone that goes into more detail on the pros and cons of each model (with real-life examples). You can check it out here.
4 steps to billing your clients
Here are four steps to client billing:
- Choose an invoicing platform
- Create a branded invoice (or subscription)
- Connect your banking details
- Connect your accounting software
Alright, let’s go through each of these steps.
1. Choose an invoicing platform
The first step to client billing is to choose a platform that allows you to collect payments. There are a handful of different options out there, with the most popular being Stripe or PayPal.
Both platforms let you create invoices and payment links that you can send to your clients. However, they are fairly bare-bones. Meaning, if you want to track other things like your client contracts, messages and notifications, intake form responses, statuses on unpaid invoices, and document detailed client information (like in a CRM), you might need a more comprehensive solution.
This is where a platform like Assembly comes into play (which is integrated with Stripe payments).

With Assembly, not only can you create and send invoices but you can also manage your entire client relationship in one place. This includes tracking payments, setting up recurring invoices for subscription-based services, and integrating with your accounting software, like QuickBooks, to make everything easier during tax season.
Now, let’s go over how to actually create and send your invoices.
2. Create a branded invoice (or subscription)
The great thing about Assembly is that you can create custom invoices that are tailored to your (or your client’s) brand. Depending on your business model, you can also create recurring payments so your clients are automatically billed on whatever frequency you decide. This way, you don’t have to worry about chasing down unpaid invoices.
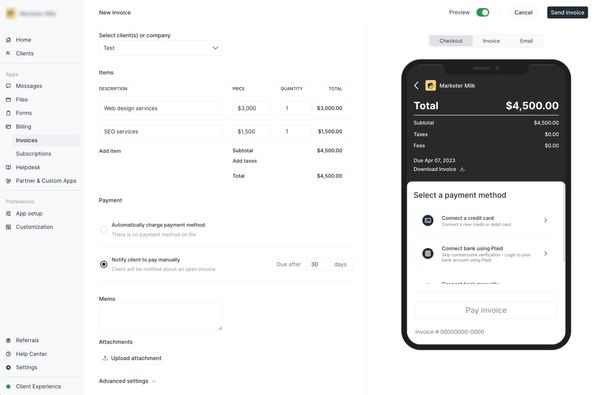
Here’s how to create a branded invoice in Assembly:
- Access the Billing App: In your Assembly dashboard, navigate to the Billing App.
- Create a New Invoice: Click on "Create New Invoice."
- Add Client Information: Select or add the client you are invoicing.
- Itemize Services: List the services provided, including descriptions, quantities, and rates.
- Customize Branding: Add your logo, brand colors, and contact information to personalize the invoice.
- Set Payment Terms: Define the due date, payment methods, and any late fees.
- Set Recurring Payments (if applicable): For subscription-based billing, set the frequency for automatic invoicing.
- Review and Send: Review the invoice for accuracy and send it directly to your client through Assembly.
It’s a fairly straightforward process, but if you’re more of a visual person (like myself), you can check out this video to follow along with:
Things to consider when invoicing
When invoicing, there are a few things you want to consider:
- Time limits: Clearly specify the payment due date to avoid confusion and ensure timely payments.
- Details: Include all necessary details such as itemized services, rates, taxes, and terms of service.
Often, we get excited about getting paid that we may overlook the small details. And, to make sure you get paid on time, it’s important to set time limits on when things are due. If you don’t give a due date, your client may decide to pay when they feel like it (and this depends on the character you are dealing with).
I’ve had some clients pay an invoice in a matter of minutes, while some have taken over a month simply because I didn’t set payment terms. My normal payment time limit has been 2 weeks. And when I set the due date it usually always gets paid before or on that date.
Sending your invoice
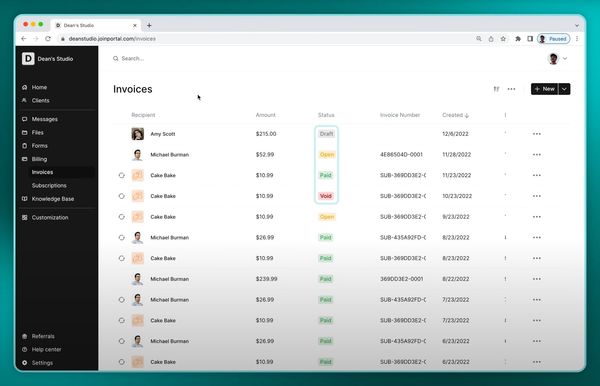
Once your invoice is ready, send it directly to your client through Assembly’s platform. Assembly allows you to track the status of your invoices, making sure you know when a client has viewed and paid them.
3. Connect your banking details
Normally when you send a simple invoice, you also need to send your client information on how to pay it. Sometimes they may just mail you a check to the address listed on your invoice. But dealing with physical checks may not be ideal, especially if you’re not near your business address to pick up your checks.
It is best to have your invoices get paid directly to your bank account, which is why Assembly lets you connect your banking details directly on the platform.
In order to successfully have your invoice completed in Assembly, you need to connect your bank account. This way, your clients can pay you directly when they receive your invoice via email.
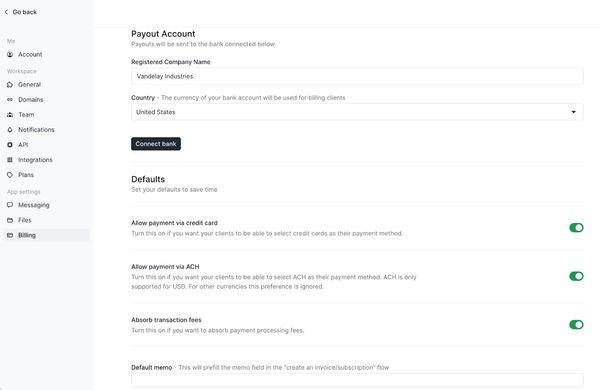
To connect your bank account:
- Navigate to Settings: Head over to the “Settings” tab at the bottom of your sidebar.
- Access Billing: Click on “Billing” within the settings.
- Connect Your Bank: Choose your bank and follow the prompts to connect it.
- Adjust Payment Options: Set up payment options for your clients. Assembly uses Stripe for secure payment processing.
You don’t need a Stripe account to get started, but you will need a bank account to get your funds deposited.
It’s important to note that different payment methods have different processing times and fees:
- Credit Cards: Fast (2-5 business days) but higher transaction fees.
- ACH Transfers: Slower (5-9 business days) but lower transaction fees.
In Assembly, you can also decide whether to absorb transaction fees or pass them on to your clients, depending on your business model and client preferences.
Alright, we are pretty much done! But, if you want to take it a step further, read on to step four.
4. Connect your accounting software (optional)
By now, you should have everything you need to send invoices and get paid. However, building a business is more than just getting paid. You also need to be mindful of administrative tasks like bookkeeping and taxes.
Assembly keeps this in mind, which is why there’s also an integration with QuickBooks. This integration allows you to easily sync your invoices and payments with your accounting software, making sure that your financial records are always up-to-date and accurate.

How to Connect QuickBooks in Assembly:
- Go to App Setup, and click + Add an app in the top right corner.
- Scroll down to the Internal Apps section and select QuickBooks.
- This action will redirect you to the QBO sign-in page. Enter your credentials to log in.
- Once logged in, you'll return to the Assembly portal with a confirmation pop-up indicating a successful connection.
For more detailed instructions about this integration, check out the Assembly QuickBooks integration guide.
Okay, now that’s (finally) it. Now you’re getting paid, and giving yourself a headache-free tax season.
Conclusion
Billing clients can feel like a daunting task. But with how far technology has advanced, we now have access to a plethora of tools that make it easy for us. This is why I love Assembly (and why I love writing for them). It’s a product I use every day. And I actually bill Assembly in Assembly — how meta.
But the tools you use go beyond just billing. Ideally, you have a platform that acts as your control center for your entire service business. A platform that can not only handle payments, but can also do things like client onboarding, client reporting, and contract creation — all in a centralized client portal.
That’s what Assembly is. It’s the “assembly” to your service business — helping to create a great client experience at every stage of your client relationships.
If you want to see what Assembly can do, I highly recommend playing around with the demo portal. And if it seems like a good fit for your business, be sure to try the free 14-day trial (no credit card required).
Here’s to getting paid (on time) for our hard work!