How to create a QuickBooks customer portal
Looking to create a QuickBooks customer portal to allow your clients to manage their payments and access important documents? This guide is for you.

Looking to create a QuickBooks customer portal that allows your clients to manage payment methods, access invoice histories, securely upload and download files, and e-sign documents?
This article is for you.
I was actually surprised to see that many QuickBooks users don’t have a clear way to create a client portal that has a native QuickBooks integration. And in this article, I’m going to walk you through a step-by-step guide on exactly how to do that.
I don’t want to make this article longer than it needs to be, so I’ve kept it short and to the point. I’ve also linked out to helpful resources and YouTube videos to help you if you get stuck. Okay, let’s get into it.
The benefits of having a customer portal for your clients
If you’ve been a customer of QuickBooks for some time, you’ll know that Intuit is trying to phase out its popular QuickBooks Desktop platform and migrate it over to the cloud-based version, QuickBooks Online. While some users have been upset with this move, I’m here to say that this is actually a good thing.
In fact, having QuickBooks phase over to an online version of the tool unlocks a whole new set of possibilities for service businesses.
It opens the door for new integrations with your entire accounting tech stack. And one of those integrations includes the ability to integrate with a third-party client portal platform — allowing your clients to log into their own portal to access files, sign documents, message you, and pay any invoices for your services.
This way, you’re not only able to create an amazing client experience, but you’re able to bring your entire client relationships into one centralized platform. Clients can easily update their payment information and you can see invoice history. You can also see all of your files and potential tax returns you’ve shared with your clients over the years.
As a service provider, it essentially becomes your back office for running your entire business. So, now that we know about the upsides of creating a QuickBooks client portal, let’s get into my six-step process (the last step is optional) on how to build this out for yourself.
How to create a QuickBooks Online customer portal (in 6 steps)
Alright, I want to make this guide simple and straightforward. Here are the 6 steps to creating a QuickBooks Online client portal:
- Sign up for a white-label client portal builder
- Customize your customer portal
- Add the QuickBooks app to your portal
- Invite your clients
- Invoice your clients for your services
- Connect your portal to your website (optional)
Let’s get started.
1. Sign up for a white-label client portal builder
The first step you need to do is sign up for a client portal platform. I’ve used a few in my time as a freelancer, but the one I always come back to is Assembly — hence why they’re letting me write this article.
I’m not going to go into too much detail on every feature that Assembly has but I’ll start by saying their largest customer base includes CPAs and accounting firms — so they address many of the client-facing issues these types of businesses run into.
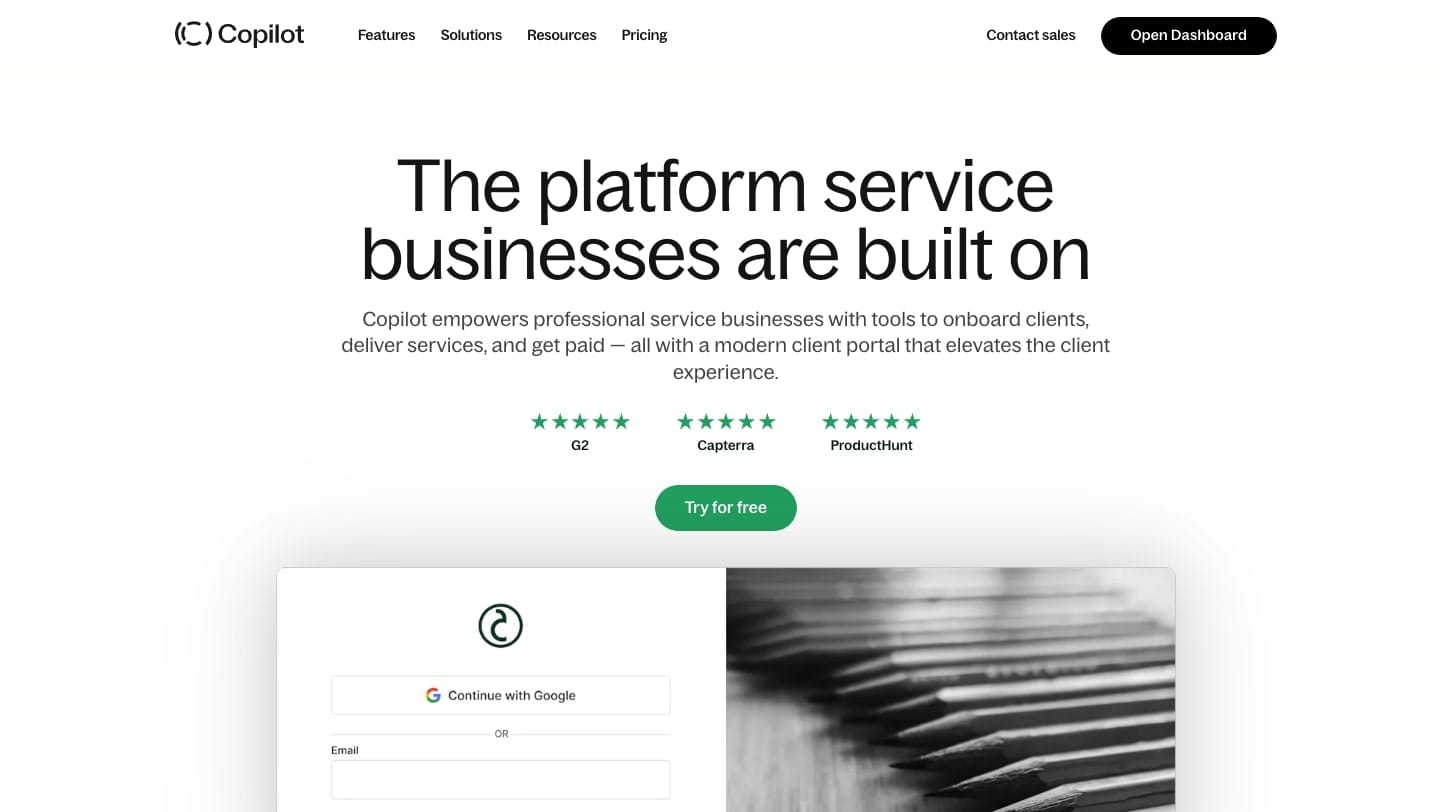
Assembly is designed mainly for the client experience. So, if you’re looking for a way to upload sensitive documents for your clients to review (and sign), or you're looking for ways to bill and invoice your clients — whether that’s one-off customer payments or setting up recurring payments — Assembly’s platform is designed for you.
The point is, QuickBooks doesn’t have a native customer portal feature that gives you the benefits of what a client portal platform does. So, you’ll need to sign up for a platform like Assembly that you then integrate with QuickBooks Online.
2. Customize your client portal
Once you decide which client portal platform to use, it’s time to customize it to fit your needs and the brand of your company. In the case of this article, I’ll show you how to do this with Assembly because of its native QBO integration.
If you’re not ready to create a Assembly just yet, you can play around with a demo portal here if you want to see how it works. But, if you’re ready to start your free trial (no credit card required) click here.
Once you create your account and log in, you’ll see your admin dashboard:
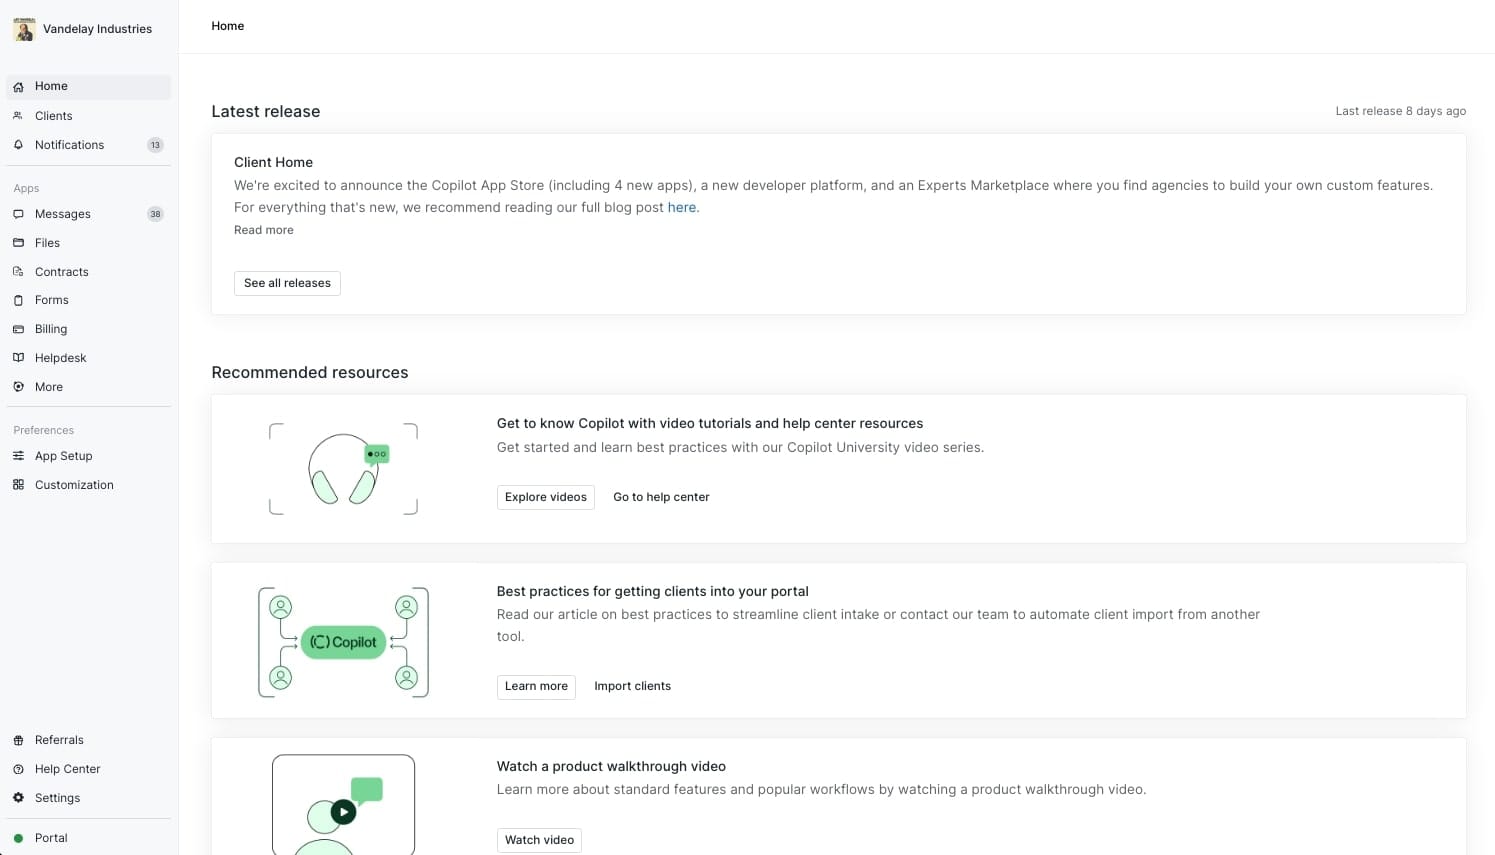
Here, you can edit your portal to fit your brand name and colors, edit your log in and sign up page for your clients to give them a self-serve experience, and find the App store to integrate with any existing tools you may already be using.
For a more detailed walkthrough on what you can edit, and how to edit it, check out this video:
Once you have your online portal customized to fit your business, it’s time to add the QBO integration.
3. Add the QuickBooks app to your portal
The next step is to add QuickBooks Online to our Assembly customer portal. To do this, head over to the right-side panel and click on ‘App Setup’.
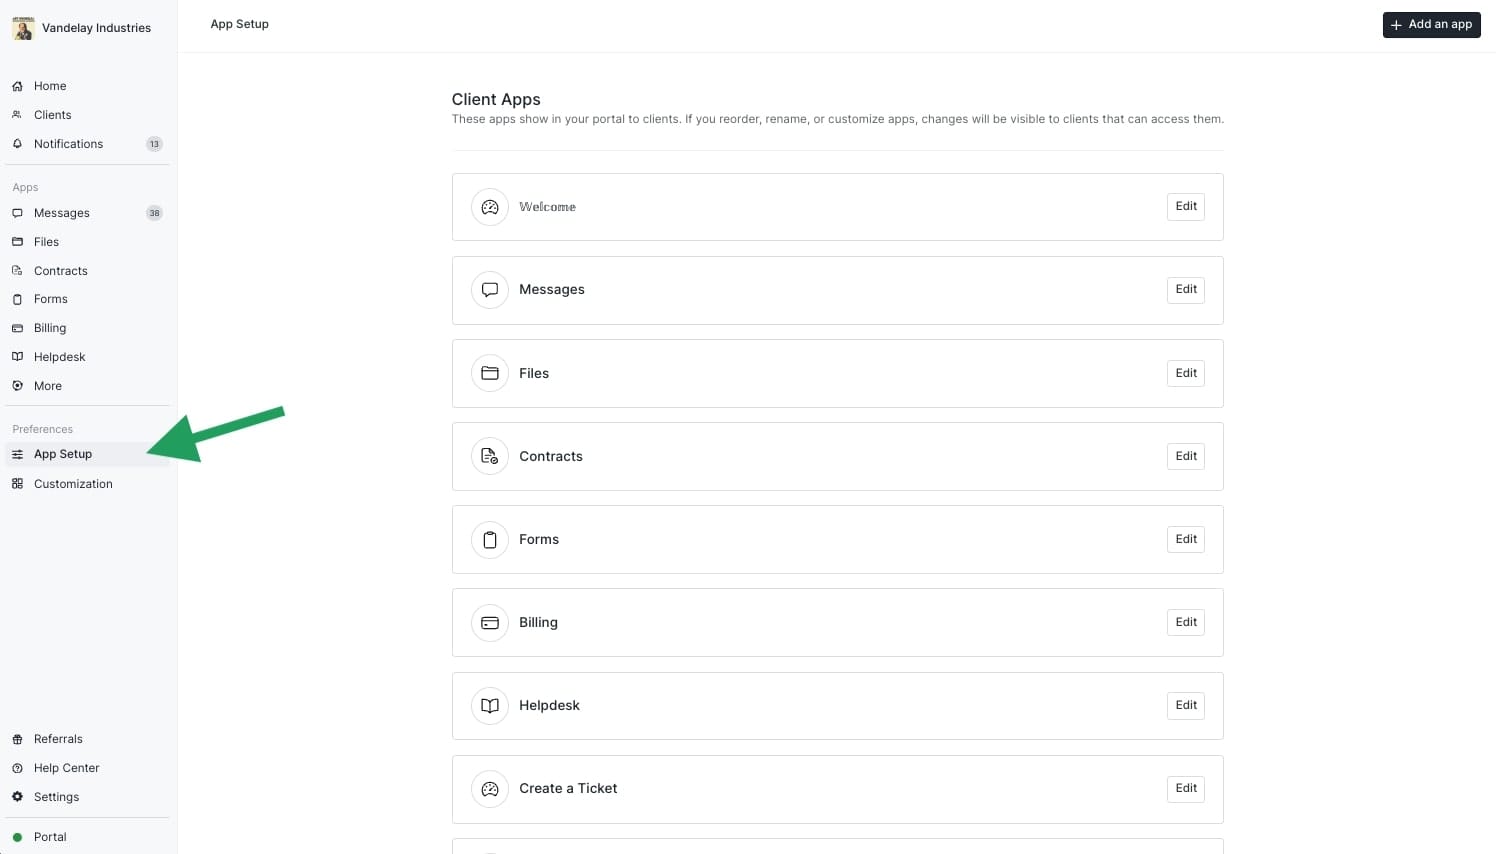
You’ll notice by default that Assembly comes with a few apps — like messages, contracts, forms, billing, and more.
To add the QuickBooks app, you’ll need to click on the button in the top right corner labeled, ‘Add an app’.
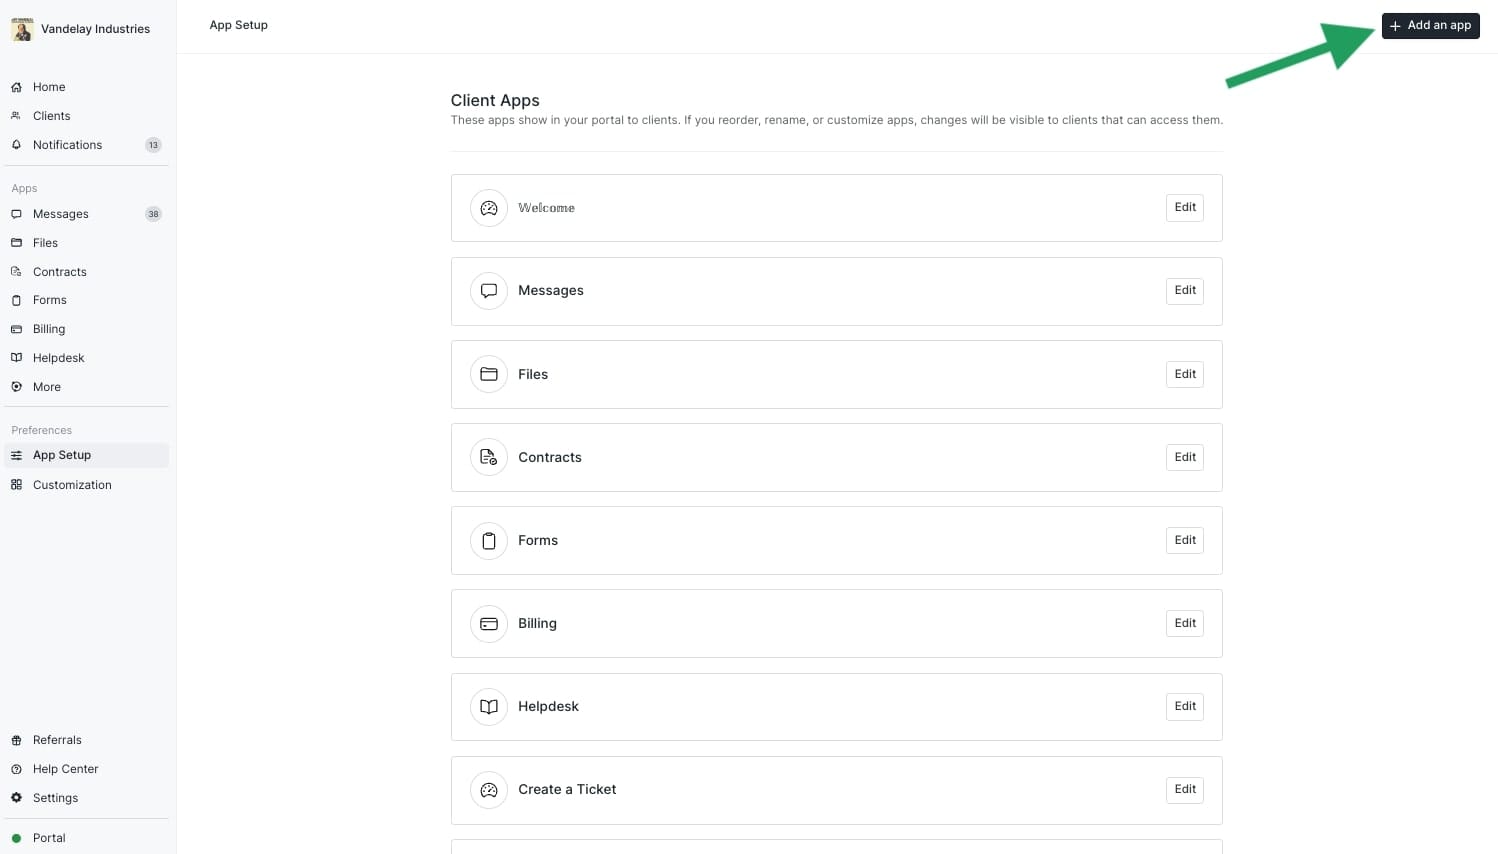
Here, you’ll be able to see a wide range of apps you can integrate and embed into your Assembly client portal. Everything from project management tools to dashboard and reporting tools can be brought into your portal — both for your internal admin portal and for your client-facing portals.
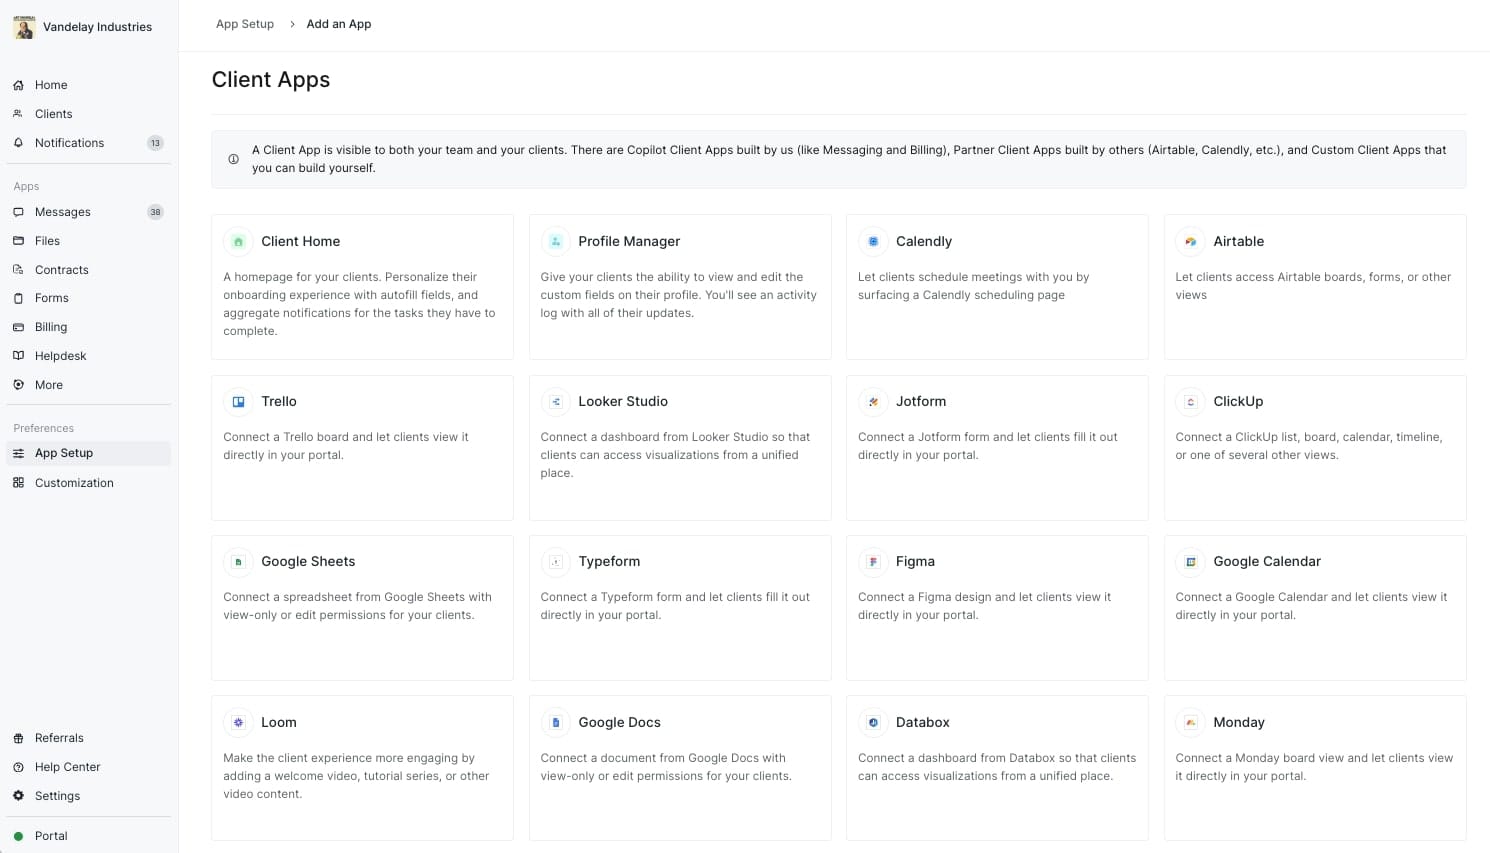
To add the QBO app, scroll down to the bottom until you see ‘Internal Apps’, and click on the QuickBooks app.
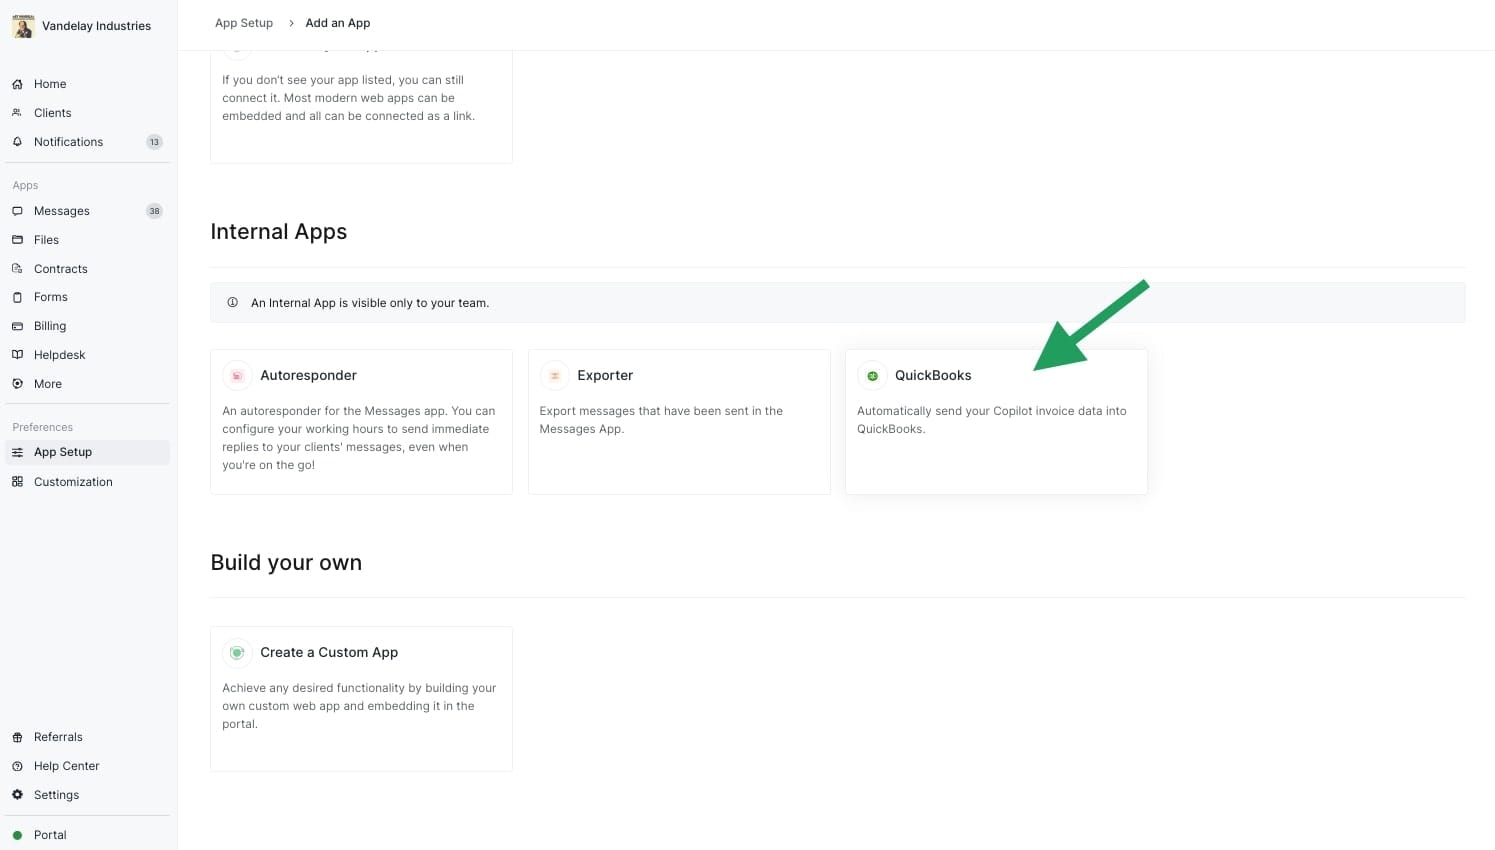
Once you click the QuickBooks option, you’ll be redirected to sign into your QuickBooks account. Once logged in, you'll return to the Assembly portal with a confirmation pop-up showing a successful connection.
If you run into any issues with this setup, check out the Assembly guide on this integration.
And there you go! Just like that, you have a customer portal that is integrated with QuickBooks. But, we’re not done yet.
Chances are, you want your clients to be able to log in and update their payment information so you can bill them for your services. In that case, let’s head over to step four.
4. Invite your clients
In this step, I’m going to show you how to invite your clients to their own client portal — that you can customize to fit their own brand if you’d like.
There are two different ways you can have your clients sign up for their own personalized customer portal:
- Invite them through your admin portal in Assembly. Here, they’ll receive an email notification with a link to make an account.
- Create ‘Sign up’ and ‘Log in’ buttons on your website and map them to a custom sign up and log in page with Assembly. I’ll go over this option in step six.
For now, I’m going to assume you want a quick way to add your clients. In this case, we’ll go with option 1 and create and invite a client on our own. Here’s a video if you want to see how to do that:
In the video above, you’ll be able to learn how to add clients one by one or how to upload a CVS to import many clients at the same time. For each client, you’ll need to input fields like:
- First name
- Last name
- Company (Optional)
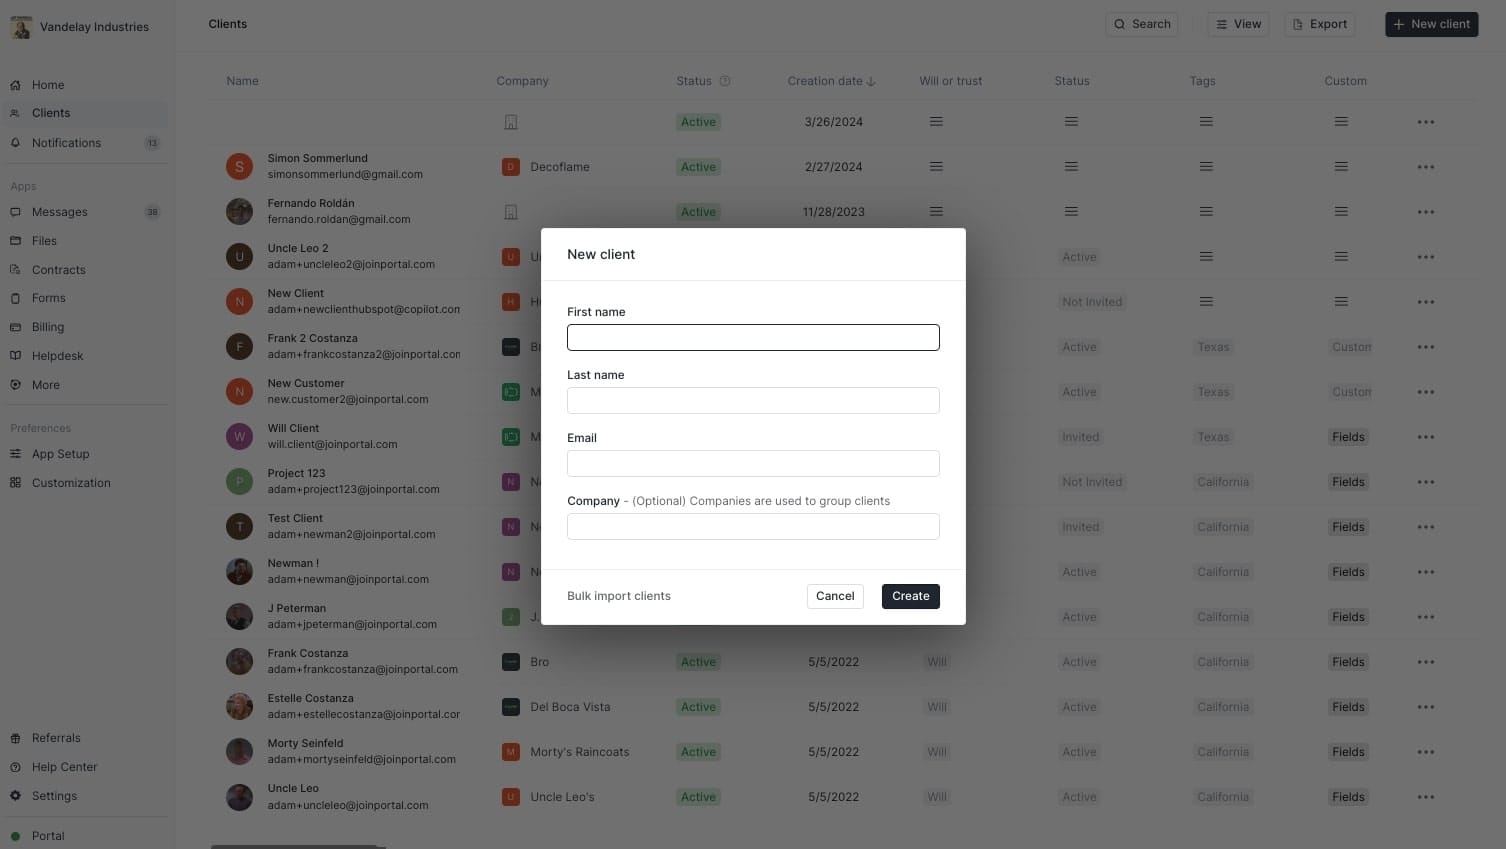
You also have the option to add custom fields if you’d like. Once you create a client, you can click into a profile and see all of your data and interactions with that client:
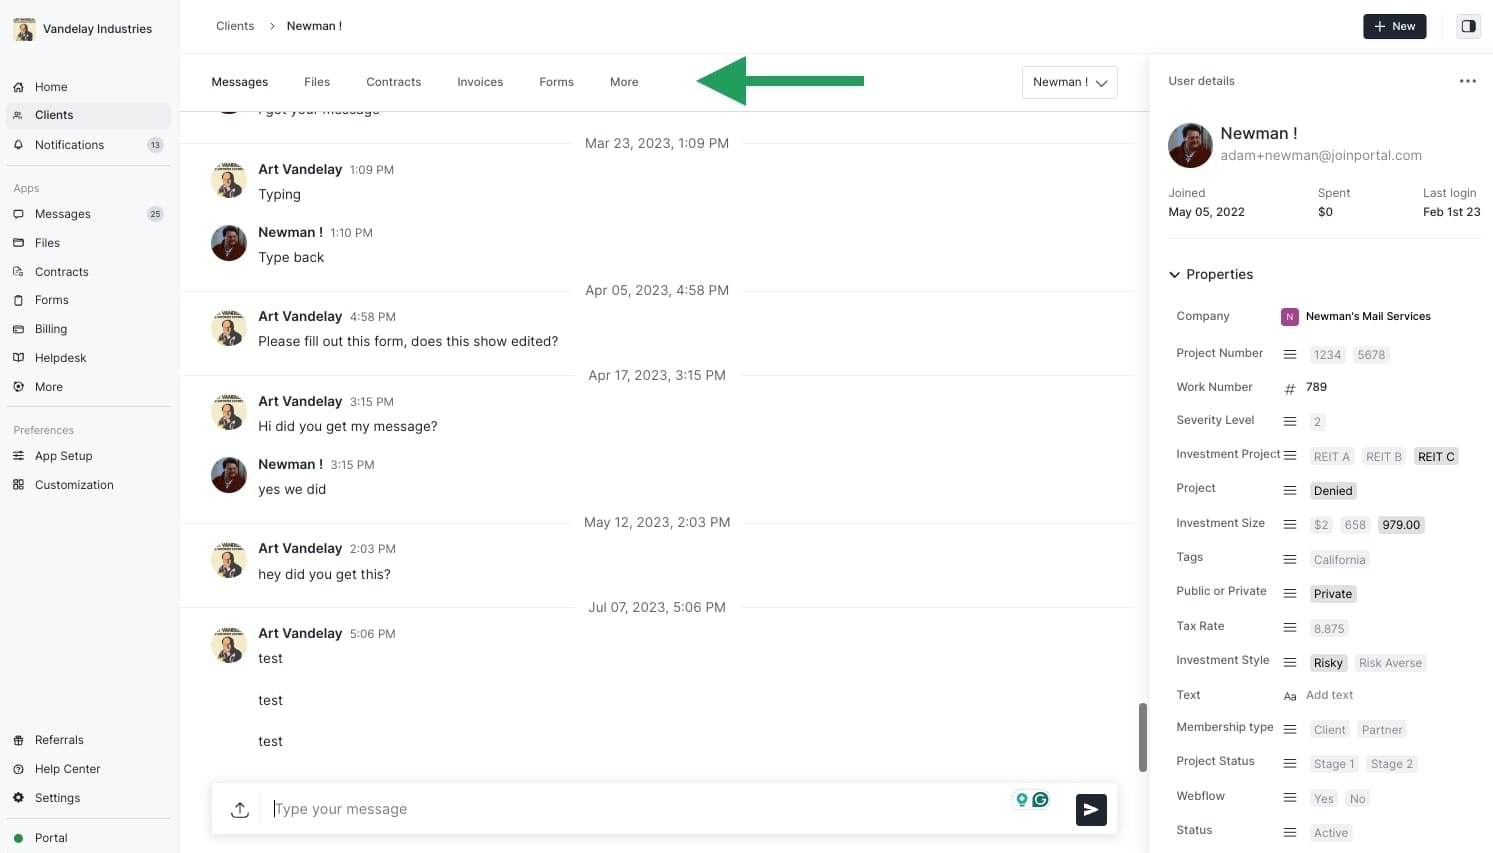
Here you can see your messages (which you can also set to send as emails to your clients), any files you want to upload for your clients to access, your service contracts, any outstanding invoices, and other app integrations. I added a green arrow in the screenshot above to where I’m referring to for these apps.
The next step is to get paid for your services.
5. Invoice your clients for your services
Whether you’re selling bookkeeping services or helping small businesses file their tax returns, getting paid for your services (and getting paid on time) is crucial to keeping your business alive.
Using Assembly’s Billing App, you can easily create branded invoices and send them directly to your clients. You can also create subscriptions that can trigger recurring payments (on any frequency you’d like) so you can “set it and forget it” when it comes to billing your clients.
I wrote an in-depth article on how to bill your clients in Assembly you can check out here. Or, you can also watch this video:
And there you go! You’ve officially created a QuickBooks customer portal using a combination of Assembly for your client portal and the native QuickBooks app in Assembly. Now, any time you create an invoice in Assembly, it will automatically reflect in your QuickBooks account as well. (Note: This integration is one way, so creating invoices in QuickBooks will not reflect in your Assembly account. Only invoices created in Assembly to reflect in QuickBooks.)
The next step is optional, but if you’d like to allow your clients to sign up or log in to their portal through your website, keep reading.
6. Connect your portal to your website (optional)
One reason I personally started using Assembly was because I wanted to make my service business feel more like a software business. In other words, I wanted to productize my services and allow existing (and potential) clients to easily log into their “dashboard,” aka client portal, on their own time.
When you make your client portal have a self-service feel, it adds a level of satisfaction for your clients. And while providing great services to your clients is at the core of your business, making sure your customers have an amazing experience working with you is how you stay in business for the long term.
With Assembly, you can set up custom domains to separate your main website that markets your services from your website that houses your client portal. For example, if your website lives on yourwebsite.com, your client portal can live on portal.yourwebsite.com or app.yourwebsite.com.
To learn how to set up your custom domain, check out this video:
If you’d rather read a guide, I wrote a handful of articles that go over how to do this based on the website builder you use. Feel free to click on any guide that is most applicable to you:
- Connect a WordPress website to Assembly
- Connect a Squarespace website to Assembly
- Connect a Webflow website to Assembly
- Connect a Wix website to Assembly
- Connect any website to Assembly,
And that’s it! Hopefully, by now, you have a working client portal that’s integrated with QuickBooks.
Conclusion
Creating a QuickBooks Online customer portal can be a complete game changer for the way you manage your service business. Not only does it help you streamline your business from an internal workflow standpoint, but it also improves your overall client experience.
It changes the way your clients perceive your business, and ultimately, your brand. At the end of the day, being a service provider is about being the best at solving people’s problems. And focusing heavily on your client experience is one way you can retain your clients for the long run.
Clients who have a great experience working with you will want to keep coming back over and over again. And the happier your clients are, the more likely they are to recommend your services to their friends and colleagues.
So it goes without saying that client retention is what leads to new client acquisition — ultimately allowing you to stay in business for a very long time.
I hope this guide was helpful and if you run into any issues, be sure to check out our other guides our reach out to Assembly’s support team (they are super responsive).

