How to create a Webflow client portal: 2 ways in 2026
Learn what a Webflow client portal is, how it connects to your website, and two proven ways to set one up for client access, delivery, and ongoing work in 2026.


Since Webflow sunset its client portal features in early 2026, I tested the current methods that allow you to add one to your website. This step-by-step guide shows you two approaches for setting up client access.
What is a Webflow client portal?
A Webflow client portal is a client-only area that connects to your Webflow site but lives outside of it. Webflow handles your public pages and navigation, while the client portal manages login access and what clients see after they sign in. This setup keeps your website focused on marketing and moves client work into a separate workspace.
How Webflow connects to a client portal
In January 2026, Webflow discontinued its native membership feature, which let you connect client portals. Now, you need external software to handle client logins, authentication, and access control on your public Webflow website.
When clients click a login or portal link, a third-party tool handles authentication and session management behind the scenes. That external system controls what they can see, what files they can access, and how they interact with your business.
For service businesses, the client portal usually functions as a workspace with projects and deliverables. For content businesses, the portal typically provides gated pages or tiered memberships.
In both cases, there are two common ways teams connect their client portals:
- Webflow + a user-management software like Memberstack: Memberstack controls who can access specific content on your Webflow site based on membership tiers or permissions. This approach works best when your portal is primarily page-based, such as a course library, resource hub, or documentation area.
- Webflow + a client portal software like Assembly: AI-powered client portal software like Assembly provides a dedicated portal for ongoing projects, files, billing, and communication. Then Webflow can just handle your website.
The right setup depends on whether you're delivering services or selling content. Below, I’ll break down how each approach works and when they make sense.
2 ways to create a Webflow client portal
Now that we’ve talked about how Webflow works with compatible external tools, here are the 2 methods for creating a Webflow client portal:
Method 1: Webflow + user management software like Memberstack
Memberstack is one of the tools Webflow recommends as a replacement for its discontinued User Accounts feature. Instead of creating a separate client portal, you can use Memberstack to control who can log in and which Webflow pages they can access based on their membership level or user role.
Note: Memberstack offers a free plan for building and testing before launch. Paid plans start at $25 per month, billed annually, with a 4% transaction fee.
Here’s how to create your client portal with Memberstack:
1. Install Memberstack's code snippet in your Webflow project settings
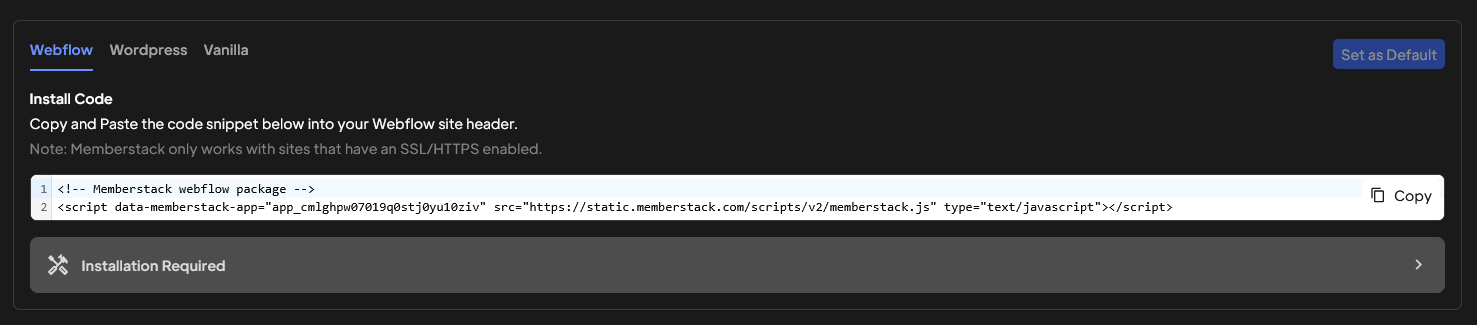
Once you log in to Memberstack and arrive at your dashboard, go to Settings > Install Code. Inside the Install Code section, select the Webflow tab, then copy Memberstack’s code snippet from that screen.
Next, go to your Webflow site and navigate to Site Settings > Custom Code.
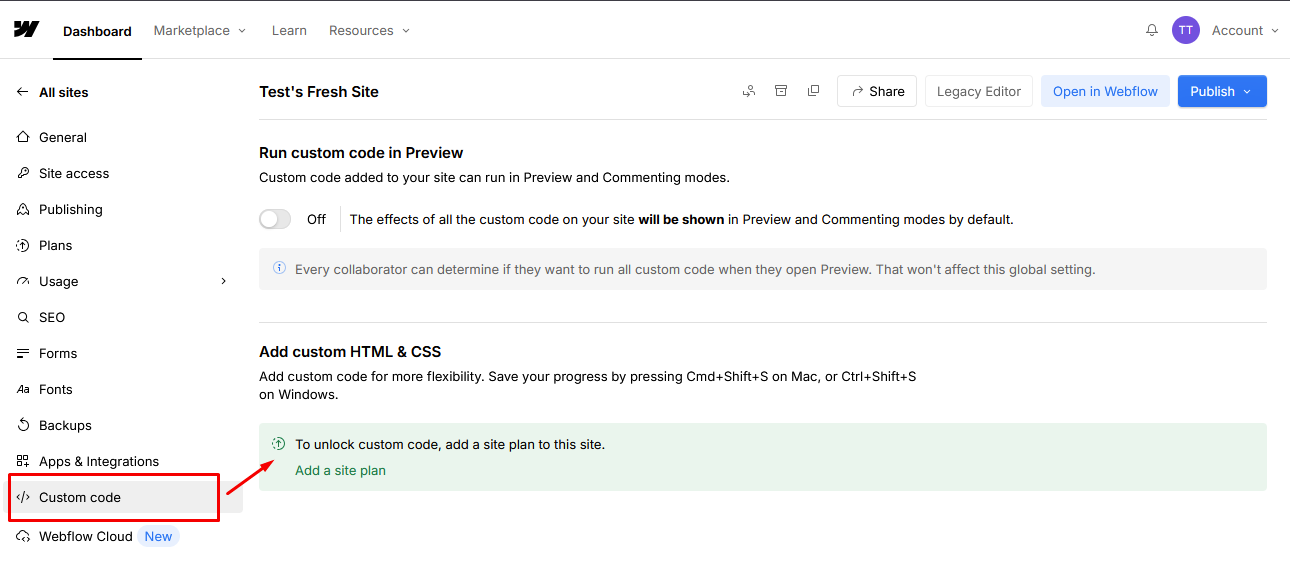
Finally, paste your code into the box and click Publish. This connects Memberstack to your site.
2. Build signup and login pages in Webflow
The simplest way to let clients create accounts on your Webflow site is to place a signup button on an existing page. Once you’ve placed a button, select it and add the attribute data-ms-modal="signup" in the element settings panel. Memberstack will automatically display a signup pop-up when users click it.
If you prefer fully custom pages, create two new pages in Webflow called “Sign Up” and “Log In.” These pages give you more control over layout and branding.
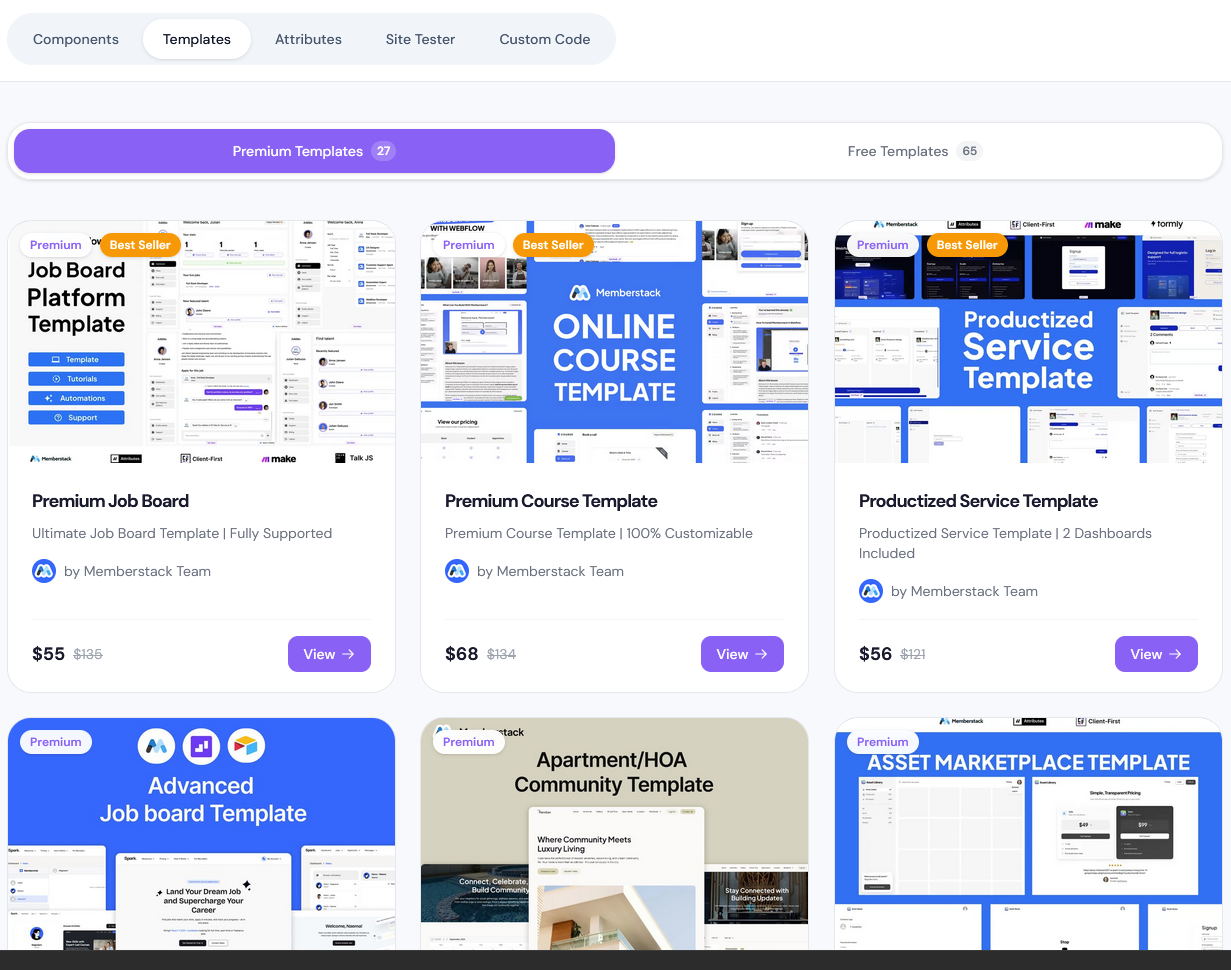
To add the signup form, go to Memberstack’s Components library, choose a signup form, click Copy Component, then paste it into your Webflow Designer canvas.
Repeat this process by selecting a login component and placing it on your “Log In” page. The components already include the necessary Memberstack setup, so you don’t have to wire up logic yourself.
Tip: If you need detailed instructions on setting up forms, Memberstack has a step-by-step guide that walks through all the methods.
3. Create membership plans
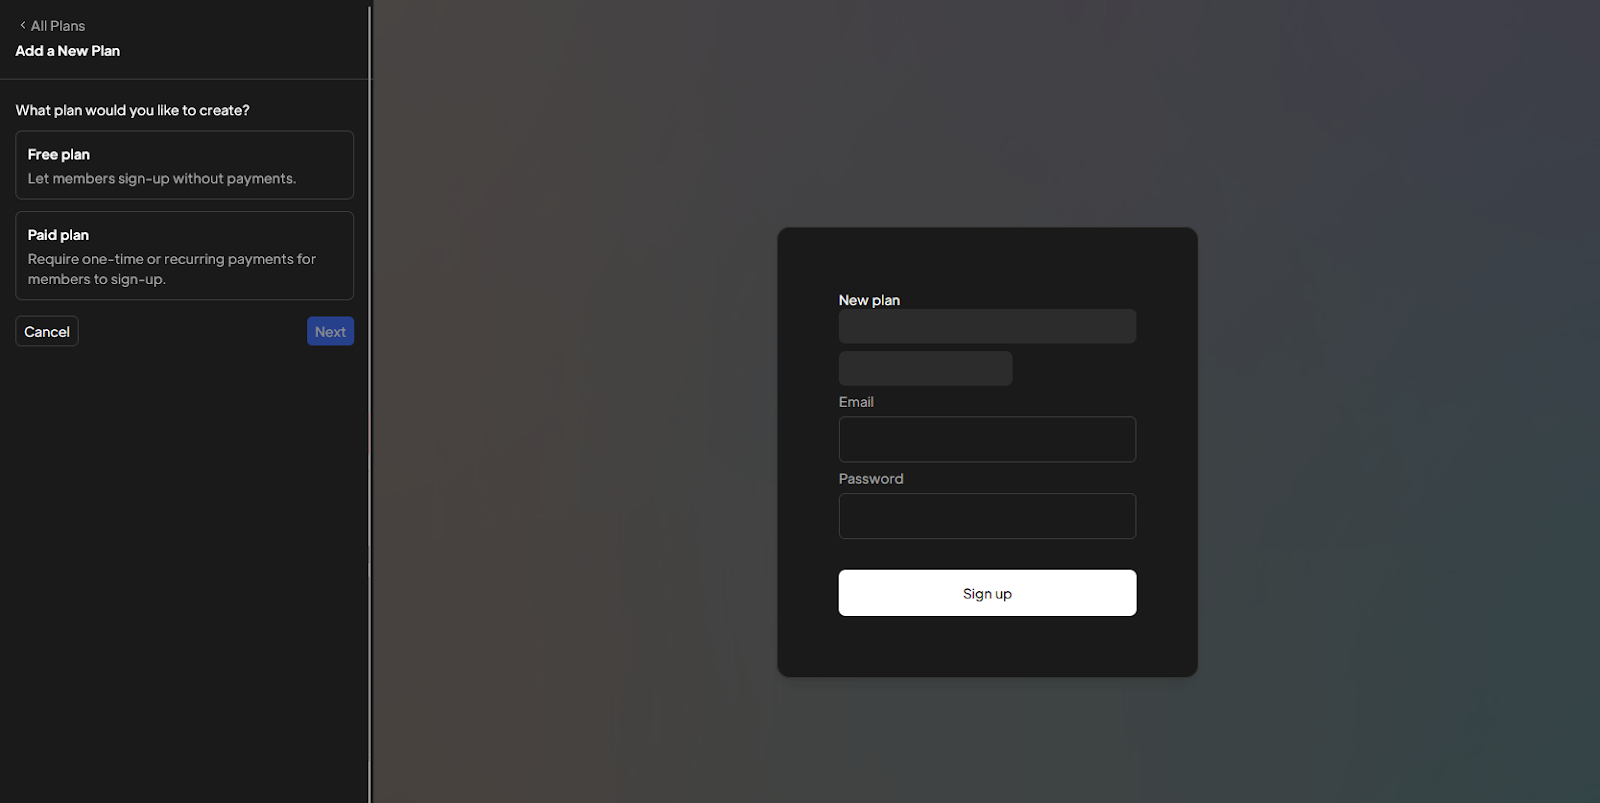
To control what each client can access after logging in, create access plans in Memberstack. In your dashboard, go to Plans to define permission levels.
Plans can be free or paid. Many agencies use free plans and manually assign clients rather than making them pay to sign up. Each plan controls which pages or folders the client can view after they log in.
There are two common ways to structure plans:
- Custom plan per client: You create a unique plan for each individual client, like 'Acme Corp' or 'Johnson Consulting,' so they only see their own project pages or files. This approach works when you have a small client list, but managing dozens of individual plans gets harder as you grow.
- Tiered plans for all clients: Instead of creating individual plans, you set up a few standard membership levels that multiple clients can belong to. For example, 'Basic' clients might see one set of resources, while 'Premium' clients get access to additional reports. All clients assigned to the same tier see the same content.
4. Create folders and pages for each client
In Webflow Designer, create separate folders to organize private content for each client. Open the Pages panel in the sidebar and click Create New Folder.
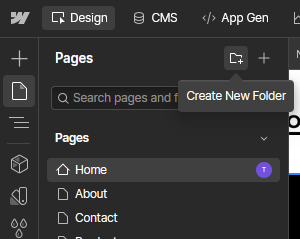
Name it after a client (like "johnson-consulting"). This creates a URL structure like yoursite.com/johnson-consulting/. Inside that folder, add new pages for whatever content you want to share, like project updates, deliverables, reports, or files.
Repeat this process for each client so everyone gets their own folder.
Tip: You can design these pages however you want, since Webflow gives you full creative control.
5. Set up content gating rules
To control which clients can access which pages, create a gated content rule in Memberstack. In the dashboard, go to Gated Content and click Add to create a new rule.
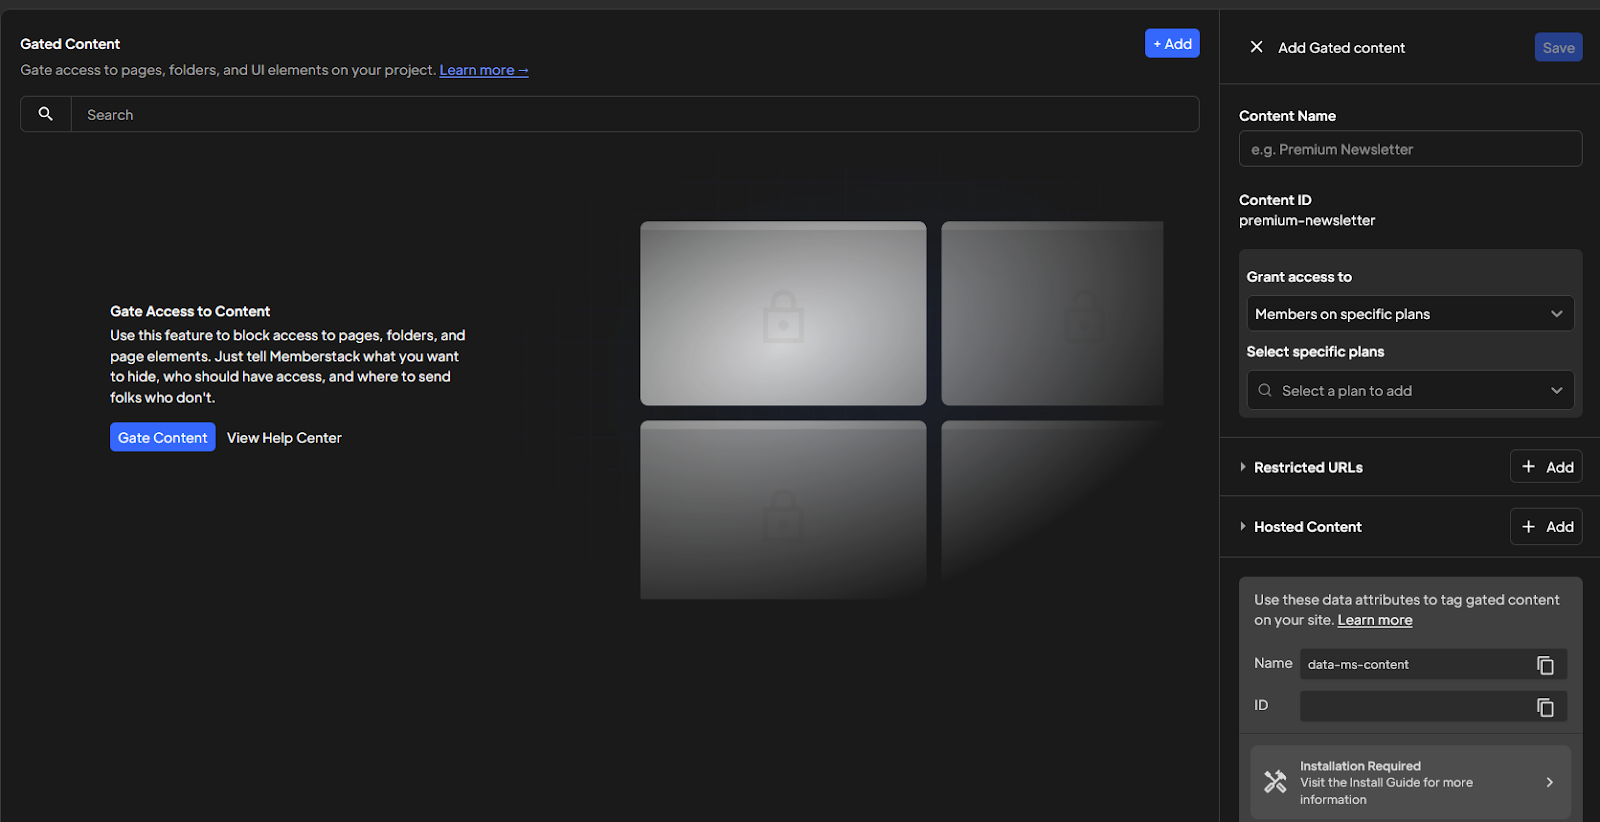
Give the rule a clear name, such as “Acme Corp Access,” then choose which membership plan should be allowed to view that content. The plan determines who gets access after login.
Next, select which pages or folders the rule should protect. If you organized your Webflow site into folders, such as placing all of Acme Corp’s content under /acme-corp/, you can gate the entire folder at once. This is usually easier to manage than locking pages individually.
Finally, set a redirect rule so that anyone without the required plan is automatically sent to your login page when they attempt to access a protected page.
Tip: If you need help, Memberstack's gated content guide walks through advanced options like locking specific elements instead of entire pages.
6. Create an instructions page
Now it’s time to make sure your clients know exactly how to use the portal once it’s live.
Create a simple page in Webflow that walks through how to sign up, log in, reset passwords, and where to find their project pages. You can include screenshots, short Loom videos, or quick bullet instructions.
Once you have more than a few clients, this page saves you from answering the same “How do I log in?” email over and over.
7. Test with a sample user
Before giving clients access, confirm that your gating rules actually work.
Create a test member in Memberstack under Members > Add Member, assign them to a plan, and log in as that user. Check that they can access only their assigned folder and are blocked from other client sections.
I recommend testing this before you send login details to real clients. It's easier to fix gating issues now than after someone's already complained that they can see another client's files.
8. Publish and manage client access
Once everything is set up and tested, it’s time to give clients access.
Publish your Webflow site and send clients the link to your signup page along with brief instructions. After they create an account, log in to Memberstack and assign them to the correct membership plan to unlock their folder.
If you prefer more control, you can create accounts for clients yourself and send them temporary passwords to reset.
Method 2: Webflow + client portal software like Assembly
With this method, you integrate a client portal like Assembly with your Webflow site to manage ongoing client work. Clients access the portal by clicking a link on your site and logging into Assembly, where they can view their projects, files, and messages.
Assembly works well here because it handles the full client relationship, not just content access. Clients get a dedicated space that reflects your brand, while Webflow serves as your marketing site.
Here’s how to create your client portal with this combination:
1. Create your Assembly account and portal
Sign up for a free Assembly trial and log in to the admin dashboard. This is where everything lives. I like to think of it as the control center for your client portal, where you manage clients, messages, files, billing, and forms.

Assembly is designed to deliver a branded client portal, not just a login page. When you add a client, it creates a private workspace that becomes their portal once you invite them. You can customize the portal’s appearance to reflect your branding and present a more professional client experience.
2. Add a test client to explore the portal
Before connecting anything to Webflow, I recommend adding a test client inside Assembly so you can see the portal from the client’s side. To add a test client:
- Navigate to the Clients page from your dashboard.
- Click on New client > Create one client.
- Enter a name and email. You can use the same email you used for your internal user if you wish.
- Copy the invite link and paste it into a browser tab. Or send an email invite to yourself and log in from the provided link.
- Activate the test client.
3. Customize your portal domain and settings
Once you’re comfortable inside your Assembly portal admin dashboard, head to Settings and open the Domains section. This is where you choose the URL your clients will use.
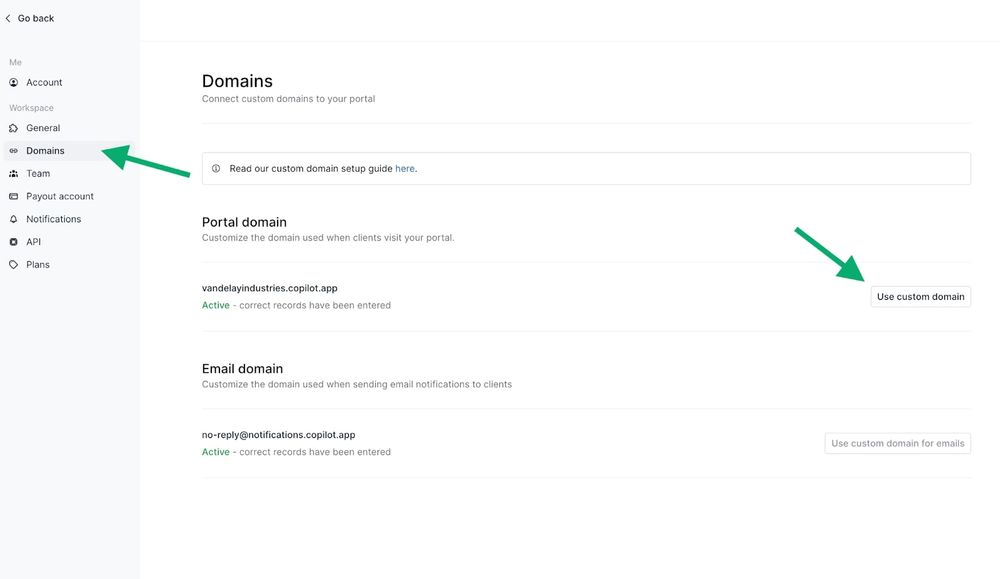
Most teams set this up as a subdomain, like portal.yourwebsite.com, so it feels connected to their main Webflow site. This portal URL is what you’ll link to from Webflow.
Custom domains are available on Assembly’s Professional plan and higher, so you’ll need to be on one of those plans to use this option.
Tip: To use a custom domain for your portal, configure your subdomain in your domain registrar’s DNS settings and follow Assembly’s custom domain setup guide for your specific provider.
4. Enable client sign-up and copy your signup link
Next, go back to your Assembly dashboard. Navigate to Settings and open the General tab, then turn on client sign-up so clients can create their own accounts.
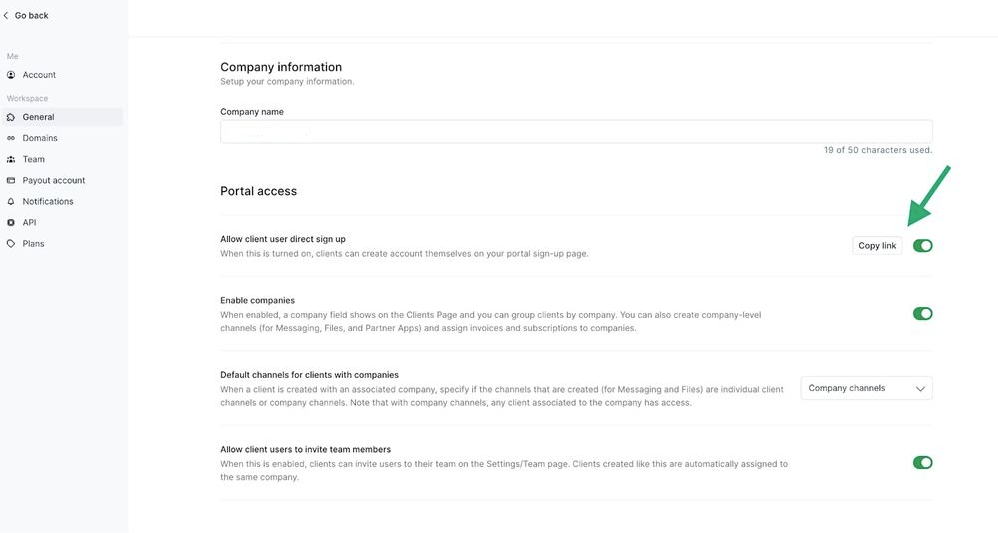
Tip: I suggest you grab the signup link at this point and keep it handy, since this is the link your Webflow signup button will point to.
5. Connect the signup link to Webflow
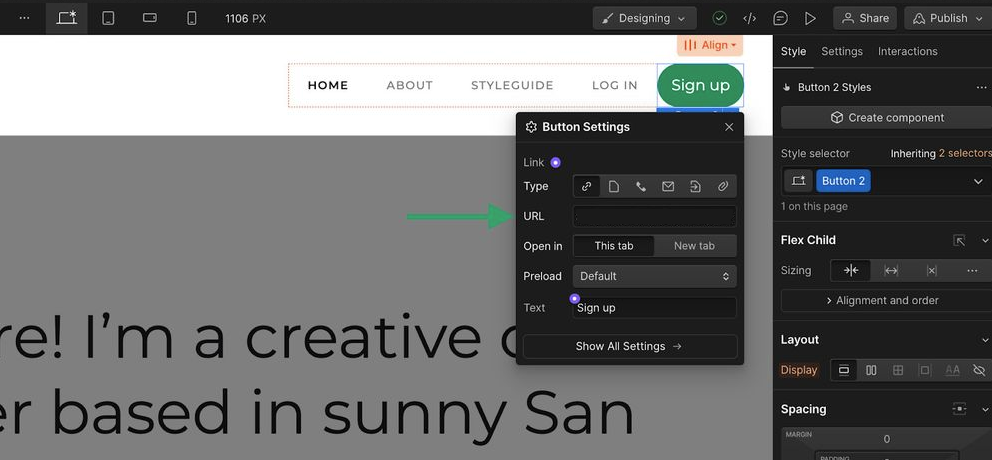
Now switch over to Webflow Designer and open the page where you added your Sign Up button, such as your homepage navigation or dedicated client login page. Select the Sign Up button, open the Link Settings panel, and paste the Assembly signup link you just copied into the URL field.
6. Add the login link to Webflow
Returning clients will need a direct login link to access their existing accounts.
To get this link, open your Assembly signup page and click “Already have an account?” This switches the screen to the login page. Copy the URL from your browser’s address bar, then go back to your Webflow Designer and paste that link into your login button settings.
7. Test the full flow
At this stage, your signup and login buttons should both be connected to your Assembly portal. Now, test the complete experience from your Webflow site.
Click the signup button and create an account. Then log out and use the login button to sign back in. Logging in as the test client you created is the easiest way to confirm everything is wired correctly before sending this to real clients.
Which method should you choose?
If you run a service business where clients need ongoing access to their projects, invoices, and deliverables, you need a workspace. If you're selling access to content that clients consume on their own, you need a paywall. Here's how to decide:
Choose Webflow + Assembly if:
- You manage ongoing client work that requires messaging, file sharing, contracts, and invoicing in one place
- Clients need a dedicated workspace instead of scattered emails and tools
- You deliver services like consulting, accounting, marketing, or legal work, where collaboration happens regularly
- Each client needs their own portal with project updates, deliverables, and payment tracking
- You want to update client information without rebuilding Webflow pages every time
Choose Webflow + Memberstack if:
- You're gating static content like courses, resource libraries, or documentation
- Clients consume content you've already created rather than work with you actively
- You need membership tiers to control who sees which pages on your Webflow site
- Clients only view pages without sending messages, uploading files, or managing projects
- You're running a membership site or content platform, not a service business
Best practices for Webflow client portals
Setting up a Webflow client portal is only part of the work. How you brand it, test it, and use it day to day determines whether clients adopt it or ignore it.
Here are some best practices you can apply:
- Keep branding consistent across your site and portal. Your Webflow site sets expectations for professionalism. If clients click through to a portal that looks completely different, it breaks trust. Match colors, fonts, and logos so the experience feels like one cohesive platform, not two separate tools duct-taped together.
- Test the client login flow before you launch. Walk through signup, password resets, and first login as if you've never seen your portal before. I've seen agencies miss broken links, confusing instructions, and missing welcome emails because they skipped this step. What makes sense to you won't always make sense to someone logging in for the first time.
- Set up automated emails for common scenarios. New client signups, password resets, invoice reminders, and project updates should trigger automatically. Manual follow-up doesn't scale, and clients expect immediate confirmations when they take action in your portal.
- Give clients a clear reason to log in regularly. If your portal just holds old invoices, clients won't check it. Add project updates, deliverable uploads, or new messages so they have a reason to come back. I recommend making the portal part of your regular client communication workflow rather than treating it as a filing cabinet they'll never open.
- Document your portal for your team, not just clients. New hires need to know how to add clients, update project details, and troubleshoot login issues. Documentation matters more than most teams realize. This becomes critical when you're scaling or someone's out of the office.
Tip: We also have a guide on client portal best practices if you’d like to learn more.
Ready to create a branded client experience? Try Assembly
Webflow doesn’t include native client portal features, so you’ll need external software. Assembly lets you add a Webflow client portal through a custom domain or login link, without managing client work inside Webflow pages.
Assembly is a client portal software tool built on a core CRM. It includes branded portals, billing, contracts, messaging, and file sharing. Clients log into a space that reflects your brand, and your team manages the full relationship without switching between tools.
Here’s what you can do with Assembly:
- Give clients a branded portal: Clients log into a space that reflects your brand to access contracts, invoices, files, and project updates without email back-and-forth.
- Keep tasks, messages, and files together: Client communication, shared files, and project tasks stay connected to each client record instead of being scattered across separate tools.
- Track client details and activity: Manage client records, communication history, and relationship data in a structured CRM that keeps everything organized in one place.
- Prep faster for meetings: The AI Assistant summarizes recent client activity and communication, helping you walk into calls with a clear picture of what’s been discussed and what’s outstanding.
- Protect client data: Assembly meets SOC 2 compliance standards with role-based permissions, encryption, and regular security audits. It also supports GDPR, CCPA, and HIPAA compliance.
- Stay ahead of clients: Highlight patterns that may show churn risk or upsell potential, making outreach more timely and relevant.
- Cut down on admin: Automate repetitive jobs like reminders or status updates that used to take hours. The Assistant handles the busywork so your team can focus on clients.
Ready to simplify how you manage client work? Start your free Assembly trial today.
Frequently asked questions
Do you need a developer to build a Webflow client portal?
No, you don’t need a developer to build a Webflow client portal if you use no-code tools. Platforms like Assembly or Memberstack handle logins, access control, and portals without custom code. You only need a developer if you want a fully custom-built portal with bespoke logic and ongoing maintenance.
Can you migrate clients later if you start with one Webflow client portal setup and outgrow it?
Yes, you can migrate clients later if you outgrow your initial Webflow client portal setup. Many teams start with a simpler approach and move to a more structured portal as client needs change. Migration usually involves reinviting clients and reorganizing content, not rebuilding your website.
How do clients typically access a Webflow client portal from your site?
Clients typically access a Webflow client portal through a login or client access link on your site. This link is usually placed in the header, footer, or a dedicated client login page. After clicking it, clients sign in and are taken to their portal.